Category: Allgemein

  • A brief study on sharpening stones – Part 27 – Atoma F140 (EP Diamond)

    A brief study on sharpening stones – Part 27 – Atoma F140 (EP Diamond)

    TL;DR: The Atoma F140 is an electroplated (EP) diamond sharpening stone with a coarse grit. It features a regular, patterned distribution of grains, in a strong nickel-chromium binder. It’s super fast in action, leaving a very coarse surface and ragged apex. It’s a very good choice to completely rework a bevel or set it on a new knife. Dr. Marv loves this stone!

    This is part of a series of blog posts – looking into the appearance and composition of commercially available sharpening stones. If you are interested in the previous episodes, check out the archive for them.

    If you have some suggestion on what I should look at next, or want to share your super secret DIY stones, I could be persuaded to open the bag of analytical devices… hit me up on Instagram under @marvgro for that.

    Disclaimer: I’m not for sale. Every review you see on this blog is bought with my own money. I have no affiliation to any manufacturer.

    Review

    Today’s sharpening stone was send to me by a very generous friend – thanks Lynn! We are looking at the 1×6″ version of the ATOMA stones, which is sold by Jende. According to the manufacturer, these “Diamond plates are premium quality diamond plates, and excel in faster cutting, prolonged durability, and delivering a consistently uniform finish across each grit level.” Let’s take a closer look:

    Optical micrographs of the stone. Instrument: Leica Emspira

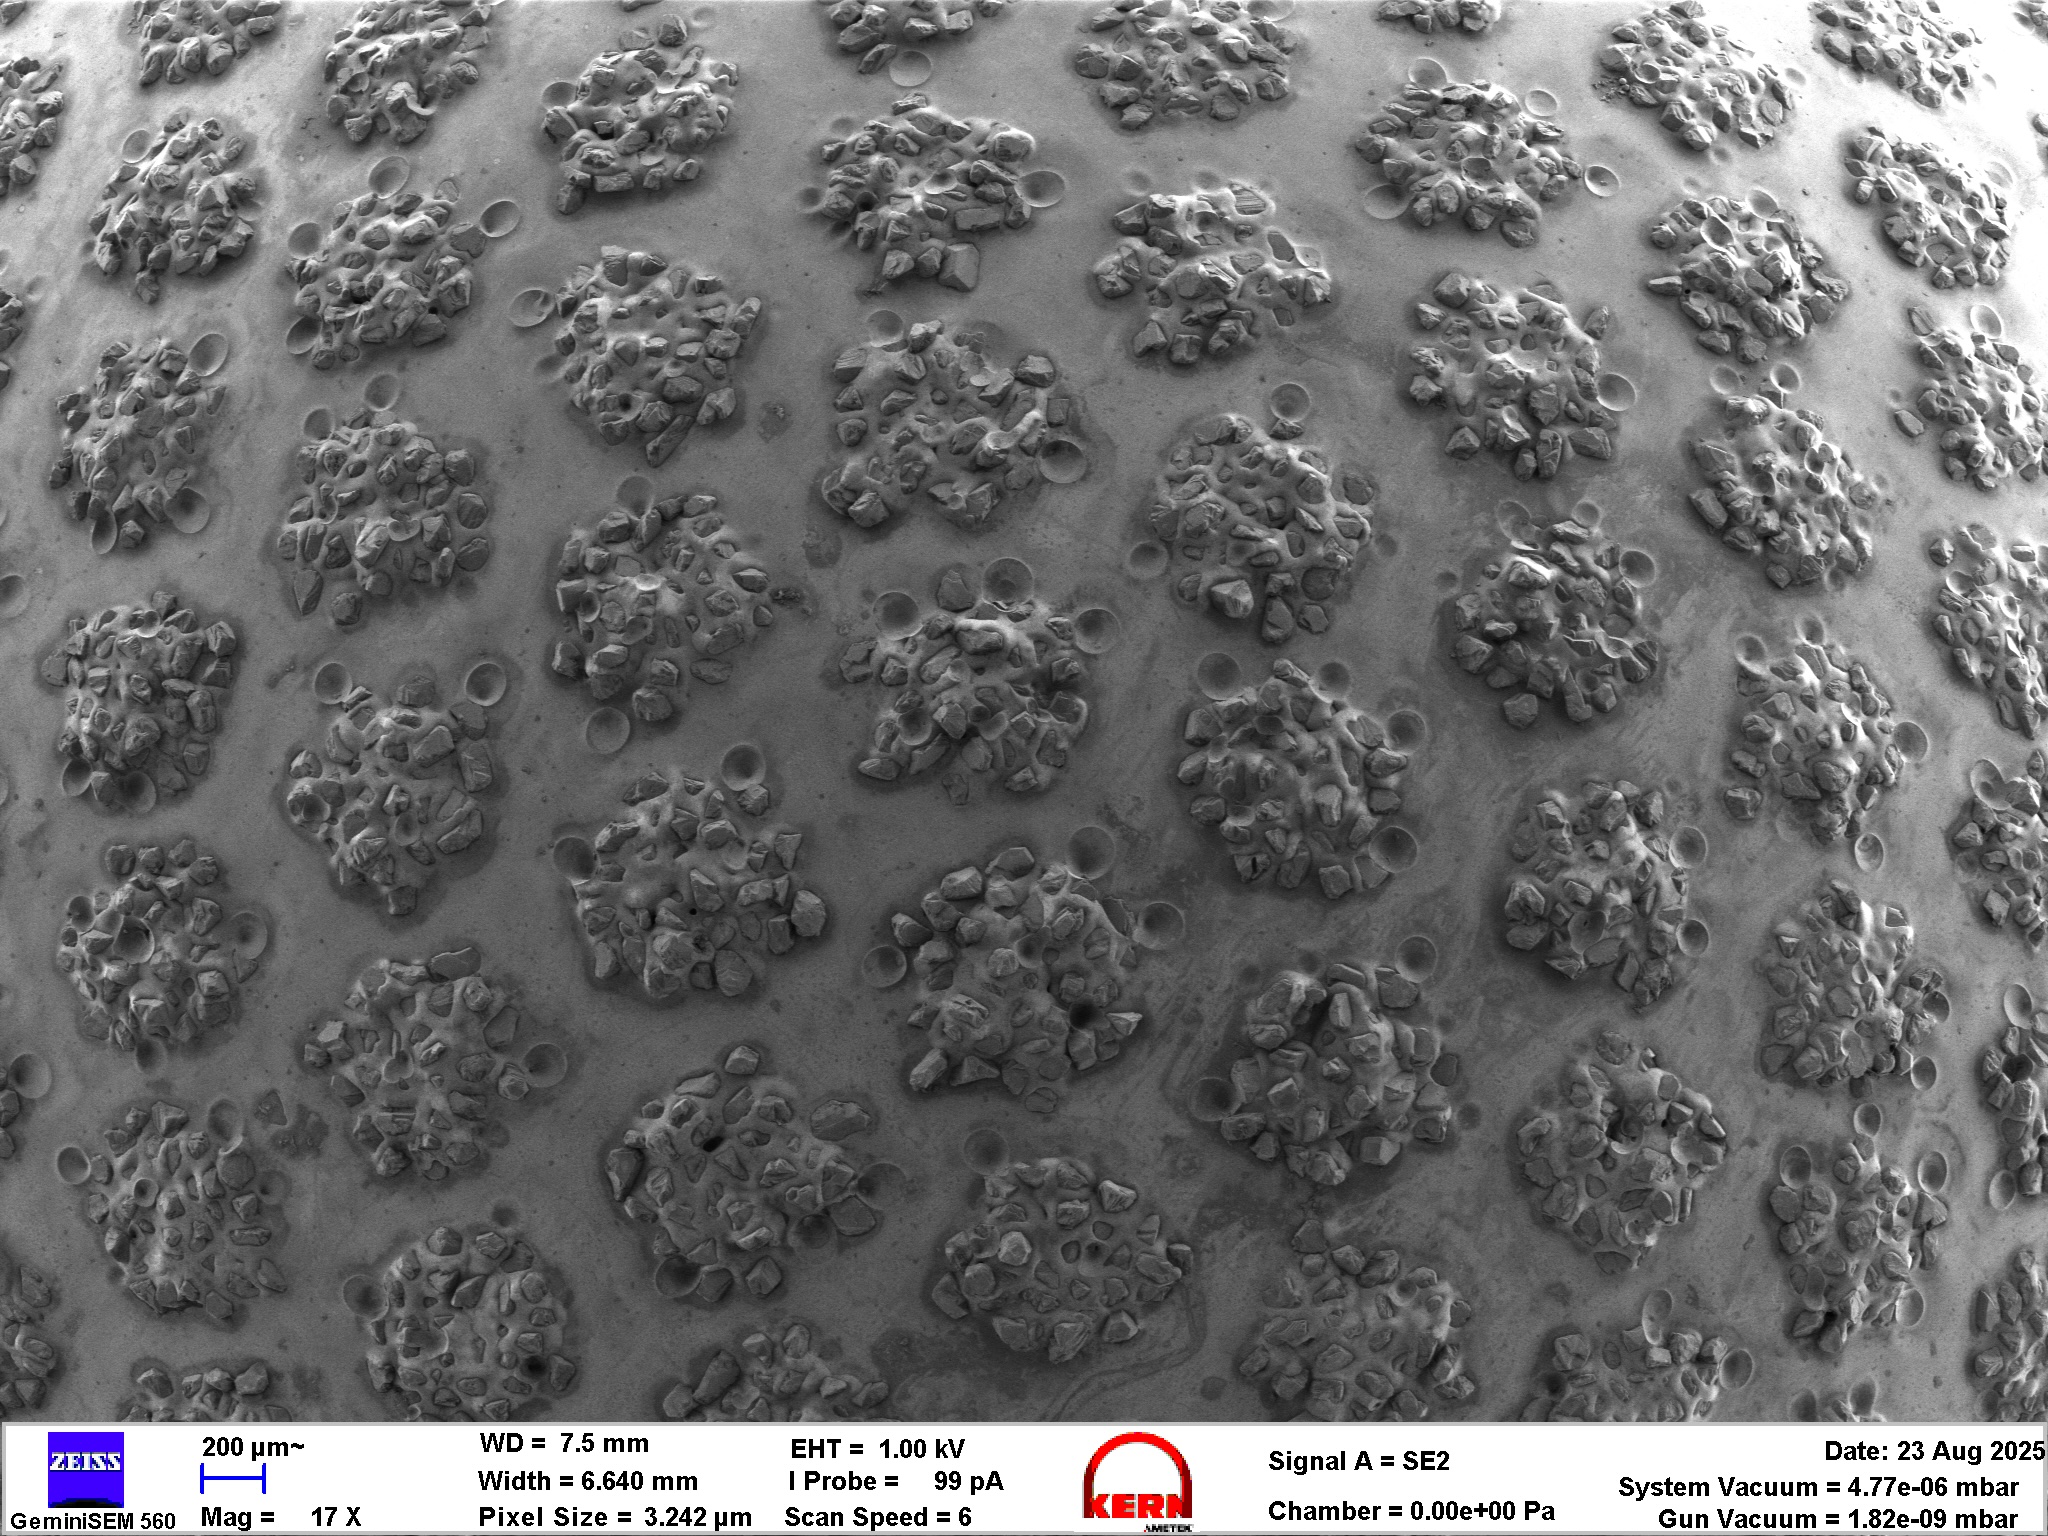
    Something immediately visible is that these stones feature a regular pattern to their diamond distribution! Now, most EP stones just show a random, scattered diamond covering. This stone meanwhile is what in the professional manufacturing world would be called an “engineered grinding surface”, often as a tool called EGW – engineered grinding wheels. The idea behind a macro structure on the tool is to allow for better chip removal, lubrication and an overall cooler cut. I don’t think those are effects we are looking for in a hand guided system, but extra space for swarf or lubrication is always welcome. Let’s take a closer look under the SEM:

    Overview mode image of the diamond, as well as a rare chamberscope peak – this is what the inside situation of the SEM looks like. The large, conical metal part at the top centre is the pole piece, where the electron beam exits. The pen like structure peaking in from the right top corner is the EDS sensor – with which we identify elements in these sharpening stones! Instrument: Zeiss GeminiSEM560.

    We can see a very regular distribution of diamonds. Remarkably enough, these “Piles” of diamonds are actually 3D shaped – I suspect multiple layers of diamond. How exciting!

    SEM micrographs of the ATOMA F140 stone. Instrument: Zeiss GeminiSEM 560.

    Moving in a bit closer, we can see that this is correct. The individual piles of the diamonds are several grains “high”, I would expect about 2-3 layers of diamond on this stone. This is very cool, as it will double or tripple the lifetime of this stone, making it better value than a single layer EP stone. The small dimples visible at the side of each pile are probably where the mask for the pattern had contact – or some airbubbles got caught.

    Let’s look at the chemical composition! For this we are going to use an advanced SEM technique called EDS. If you want to know more about this, I’ve written extensively about SEM microanalysis here on this blog.

    EDS analysis of the stone. Instrument: Oxford Ultim Max  ∞ 40mm2 EDS sensor. Note that our EDS sensor doesn’t show elements lighter than boron.

    EDS analysis shows a high tech bond, with quite a bit of Chromium in it. While not the most environmentally friendly nickel coating, this is a very strong and hard galvanic binder, much better than on any EP stone we have seen so far on the blog. A side note: a large portion of the general population is extremely allergic to nickel. If you experience rashes from using EP stones, this might be a reason.

    In order to evaluate the sharpening performance and material removal mode of this stone, a blade was sharpened with it. I am using a standardised testing procedure, read about it hereNevertheless, it’s 65 HRC M398, and sharpened to 17 DPS with resin bond diamond stones down to 10 µm. Afterwards, the tested stone is used, first in a back and forth movement until the surface becomes homogenous, and then alternating strokes (5-5-3-2) on each side, for a total of 20 strokes towards the apex per side. No pressure is applied but the weight of the apparatus.

    The edge is then analysed in the electron microscope for breakouts and morphological appearance.

    SEM micrographs of the edge finished with the Atoma F140 stone. Instrument: Thermo Fischer PhenomXL SEM.

    The stone itself feels super coarse – much more so than the grit size would implicate. This is because the feedback (which is a very fancy jargon word for vibration and friction induced sensation) on this stone is dominated by the pattern on the stone, and not the actual grit size. It feels more like a file than a stone. Nevertheless, it is super quick cutting, and as we can see on the SEM – it does cut, and remove material. The surface is very coarse, rough and shows deep scratches. The apex is still very visible – as we can see at larger magnifications, quite a bit of pressure from the individual, large grains lead towards whole portions of the apex breaking off.

    Optical micrographs of the edge finished with the Atoma F140 stone.

    The optical micrographs highlight this even more – this is a very coarse stone. It’s pretty durable, and super fast. I think this is a fantastic method to rework a knife to a new angle, or make the initial bevel on a newly made knife. Overall, I loved this stone. This is my favourite EP stone so far, and has become a regular stone I use in my sharpening. Just…don’t stop at this stone! There’s finer ones 🙂

    Sharpening disclaimer: I use a standardised approach to sharpening, which basically follows how most manufacturer of guided systems tell you to use this system. I am very aware, that every stone could perform much better than this, in terms of sharpness, but I want a comparable approach. The sharpening segment mostly shows the material removal mechanism – is it burnishing? is it cutting? is the cutting pressure too high so that carbides crack? Is there massive burr or prow formation? The BESS value definitely doesn’t highlight the ultimate sharpening performance of the stone, but was an often requested information. Over time, this blog will show BESS values for different edge morphologies, but by the holy endmill – don’t read it as a „this is the max value this stone can achieve“. I would also suggest to familiarise yourself with the works of Immanuel Kant, it’s absurd I need to write such a disclaimer here.

  • A brief study on sharpening stones – Part 23 – Dr. Marv’s Scientific Sharpening Stones, 20 µm (Diamond)

    A brief study on sharpening stones – Part 23 – Dr. Marv’s Scientific Sharpening Stones, 20 µm (Diamond)

    This is part of a series of blog posts – looking into the appearance and composition of commercially available sharpening stones. If you are interested in the previous episodes, check out the archive for them.

    If you have some suggestion on what I should look at next, or want to share your super secret DIY stones, I could be persuaded to open the bag of analytical devices… hit me up on Instagram under @marvgro for that.

    Disclaimer: I’m not for sale. Every review you see on this blog is bought with my own money. I have no affiliation to any manufacturer. Note: this review is for my own product and in certain countries can be considered as advertisement. Therefore: beware, WERBUNG!

    Review

    Today’s sharpening stone is something very, very special. I humbly and very proudly present to you the result of spending a decade in the pursuit of REMOVING MATERIAL. The mad Dr. Marv bring’s you the fabulous:

    Dr. Marv’s Scientific Sharpening Stones

    This is my own design. I’ve taken a look at a good portion of the commercially available stones, and if you are an avid reader of this blog, you might have discovered: I didn’t like a lot of them. One reason for that is the fact that most commercially available sharpening stones are made by large abrasive manufacturers, that only adapt or outright take an abrasive designed for CNC grinding, and expect it to work on our delicate, hand guided sharpening action. I’ve taken a different route: through the scientific method I’ve designed an abrasive especially suited for manual sharpening. It’s main features are:

    1.) Very high concentration of diamonds

    2.) very tight quality control and abrasive hygiene – no foreign particles in my stones!

    3.) a specifically designed binder, with a special, proprietary treatment of the diamonds to increase bond strength.

    Let’s start looking at the stones! We start with the 20 µm nominal size one:

    Optical micrographs of the stone. Instrument: Leica Emspira

    The stone is a slightly greenish colour, which stems from the diamond type used. We can see regular stripes going from left to right, with a low roughness. All particles are either sparkling diamond, or if oriented in a way that no refraction happens, pure greenish diamonds. The bond itself is colourless and off white.

    The stripes that can be seen are the result of the dressing employed. If you’ve read my article on dressing, or any other review, you’ve realised by now that flattening/dressing is a source of contamination. In order to avoid this, I use single point diamond chisseling – a very advanced manufacturing technique, where a very sharp, lapped diamond tool is moved in a linear motion across the surface. This has the advantage, that no foreign particles can be pushed into the surface, and exceptionally smooth and flat surfaces can be created. Here, the roughness is specifically adjusted to allow for a maximum of lubrication.

    SEM micrographs of a broken through stone. Instrument: Thermo Fischer PhenomXL.

    In order to better show the diamond density and distribution, I took a stone and broke it in half. What you are looking at above is the “cleaved” surface through the stone. We can see that a) this is only and purely diamond! no foreign particles! and b) there is a MASSIVE amount of diamond in this stone. Compare this to any other diamond stone you have seen before on this blog.

    The standard for grinding abrasives states the concentration in percent – a C100 concentration is supposed to be 25% by volume. The actual measurement (volume, weight times density, volume before sintering, volume after sintering…) is to my knowledge not defined. I have decided to just state the percentage by weight – which is 50%. 50% of this stone is diamond, 50% is resin.

    Moreover, I’ve taken special care in the QC and production of these stones. The resin, aluminium and work is all made in Germany. The diamond is sourced from abroad, but heavily checked under the scanning electron microscope:

    SEM micrograph of the used diamond powder. Instrument: Thermo Fischer Phenom XL

    This first batch has the following particle metrics:

    Particle metrics for the 20 µm nominal sized stone.

    In order to evaluate the sharpening performance and material removal mode of this stone, a blade was sharpened with it. I am using a standardised testing procedure, read about it hereFor this blade, the edge was first set with a coarse F150 electroplated diamond stone, and then prepared with a F400 and F600 EP diamond stone from TSPROF.

    The edge is then analysed in the electron microscope for breakouts and morphological appearance.

    SEM micrographs of the edge after preparation with the TSPROF F600 stone. Instrument: Thermo Fischer PhenomXL SEM.

    Then, the edge is prepared with the Dr. Marv 20 µm stone. The stone is lubricated with a high performance honing oil. Afterwards, the edge is cleaned. No deburring/stropping is undertaken. We can see that a much smoother, more homogeneous edge is created. The burr is removed and a finer apex created.

    SEM micrographs of the edge after preparation with Dr. Marv’s 20 µm stone. Instrument: Thermo Fischer PhenomXL SEM.

    The difference is also easily visible under the optical microscope (note the identical magnification, chamfers are just differently sized as I used separate pieces of steel).

    Edge Morphology under the optical microscope. First/Left picture: finished with F600 EP. Right/Second picture: Finished with Dr. Marv’s 20 µm stone. Instrument: Leica Emspira.

    Photo of the surface of the cutting chamfer. Note the already very shiny reflection!

    That’s it folks. I’m very proud to announce that these are now available in a very limited handmade batch. Link is here or find it in the shop the top of the blog!

    The medium grit set of Dr. Marv’s Scientific Sharpening Stones in their storage box. Proudly handmade by Dr. Marv in the German Alps.

  • A brief study on sharpening stones – Part 22 – Imanishi Bester 6000 Grit

    This is part of a series of blog posts – looking into the appearance and composition of commercially available sharpening stones. If you are interested in the previous episodes, check out the archive for them.

    If you have some suggestion on what I should look at next, or want to share your super secret DIY stones, I could be persuaded to open the bag of analytical devices… hit me up on Instagram under @marvgro for that.

    Disclaimer: I’m not for sale. Every review you see on this blog is bought with my own money. I have no affiliation to any manufacturer.

    Review

    Today’s sharpening stone is another japanese artificial sharpening stone. The Imanishi “Bester” series is supposed to be usable after just splashing with water, instead of soaking. I think this sounds very promising for a guided system! Funnily enough, in my native German language, “Bester” means…the best. Let’s see whether this is true:

    Optical micrographs of the stone. Instrument: Leica Emspira

    The stone is an off-yellow-whiteish colour. Some darker particles can be identified all over the stone, some black, some just off colour.

    SEM micrographs of the stone. Instrument: Zeiss GeminiSEM 560.

    Under the SEM, this stone shows a mix between blocky, fine particles and some smoothed over plateaus. In these plateaus, fine abrasive dust fills the voids, making it appear denser. Overall, the grains are either very blocky, or very flakey!

    Let’s look at the chemical composition! For this we are going to use an advanced SEM technique called EDS. If you want to know more about this, I’ve written extensively about SEM microanalysis here on this blog.

    EDS analysis of the stone. Instrument: Oxford Ultim Max  ∞ 40mm2 EDS sensor. Note that our EDS sensor doesn’t show elements lighter than boron.

    This stone shows a wonderful colourmap of the elements! This is once again a mix between SiO2 and Al2O3, but wonderful homogenous in it’s distribution! It appears as if they have the mixing down. Some foreign particles, especially of K, Ca can be detected. This is to be expected in oxide ceramics, and their percentage is very low (< 1 %).

    3D surface height map of the stone. Instrument: Bruker Alicona µCMM, 50X objective lens, 3×3 FOV high resolution focus variation scan. Data is leveled and outliers removed (0.25%).

    The 3D height map shows a smoother surface, with lot’s of plateaus and very little voids. This makes this stone exceptionally smooth for an oxide stone, the Sa and Sq values reflect this.

    ISO 25178 parameters.

    In order to evaluate the sharpening performance and material removal mode of this stone, a blade was sharpened with it. I am using a standardised testing procedure, read about it hereNevertheless, it’s 65 HRC M398, and sharpened to 17 DPS with resin bond diamond stones down to 10 µm. Afterwards, the tested stone is used, first in a back and forth movement until the surface becomes homogenous, and then alternating strokes (5-5-3-2) on each side, for a total of 20 strokes towards the apex per side. No pressure is applied but the weight of the apparatus.

    The edge is then analysed in the electron microscope for breakouts and morphological appearance.

    SEM micrographs of the edge finished with the stone. Instrument: Thermo Fischer PhenomXL SEM.

    Moreover, the stone had a very nice, smooth friction based feedback and quickly build up some abrasive slurry. The whole surface was matted more or less instantly – it doesn’t really hit my aesthetic, but is remarkable nevertheless. This matte surface stems from thousands of micro scratches all over the surface. To show this, I’ve taken a picture in the middle of the cutting edge surface:

    Overall, this stone made a very homogeneous, sharp edge. It is well manufactured. I don’t think it’s the correct choice for such a high carbide steel, and would probably perform better on a high carbon steel. I hesitate to state this…but I kind of liked this stone!