Author: Dr Marv

  • A brief study on sharpening stones – Part 19 – TSPROF Alpha 120

    This is part of a series of blog posts – looking into the appearance and composition of commercially available sharpening stones. If you are interested in the previous episodes, check out the archive for them.

    If you have some suggestion on what I should look at next, or want to share your super secret DIY stones, I could be persuaded to open the bag of analytical devices… hit me up on Instagram under @marvgro for that.

    Disclaimer: I’m not for sale. Every review you see on this blog is bought with my own money. I have no affiliation to any manufacturer.

    Review

    Today’s sharpening stone is one I am MASSIVELY excited for! They are being hailed on the internet as the best new stones, and are so brand new you couldn’t buy them for quite some time outside of > 5 stone sets. According to TSPROF, these are a totally novel, super high end resin type stone. YouTube reviews were over the moon, and finally, after about half a year of lusting after them, they are being sold individually in the EU and I managed to buy a 120 µm and a 5 µm one – which is featured in Part 20 of our brief study of sharpening stones!

    A note before we dig into the abrasive: the stones have a premium finish. Fully anodised, laser engraved… quite a contrast to other TSPROF stones which are blank aluminium stripes!

    Optical micrographs of the TSPROF Alpha 120 stone. Instrument: Leica Emspira

    The abrasive compound at this size is easily identified via an optical microscope. We can make out large diamonds (the green translucent grains), large black grains (which are probably SiC!) but also small & large, very white grains – a bit too white for aluminiumoxide! I wander what those are. Very curious! Let’s dig into the SEM pictures.

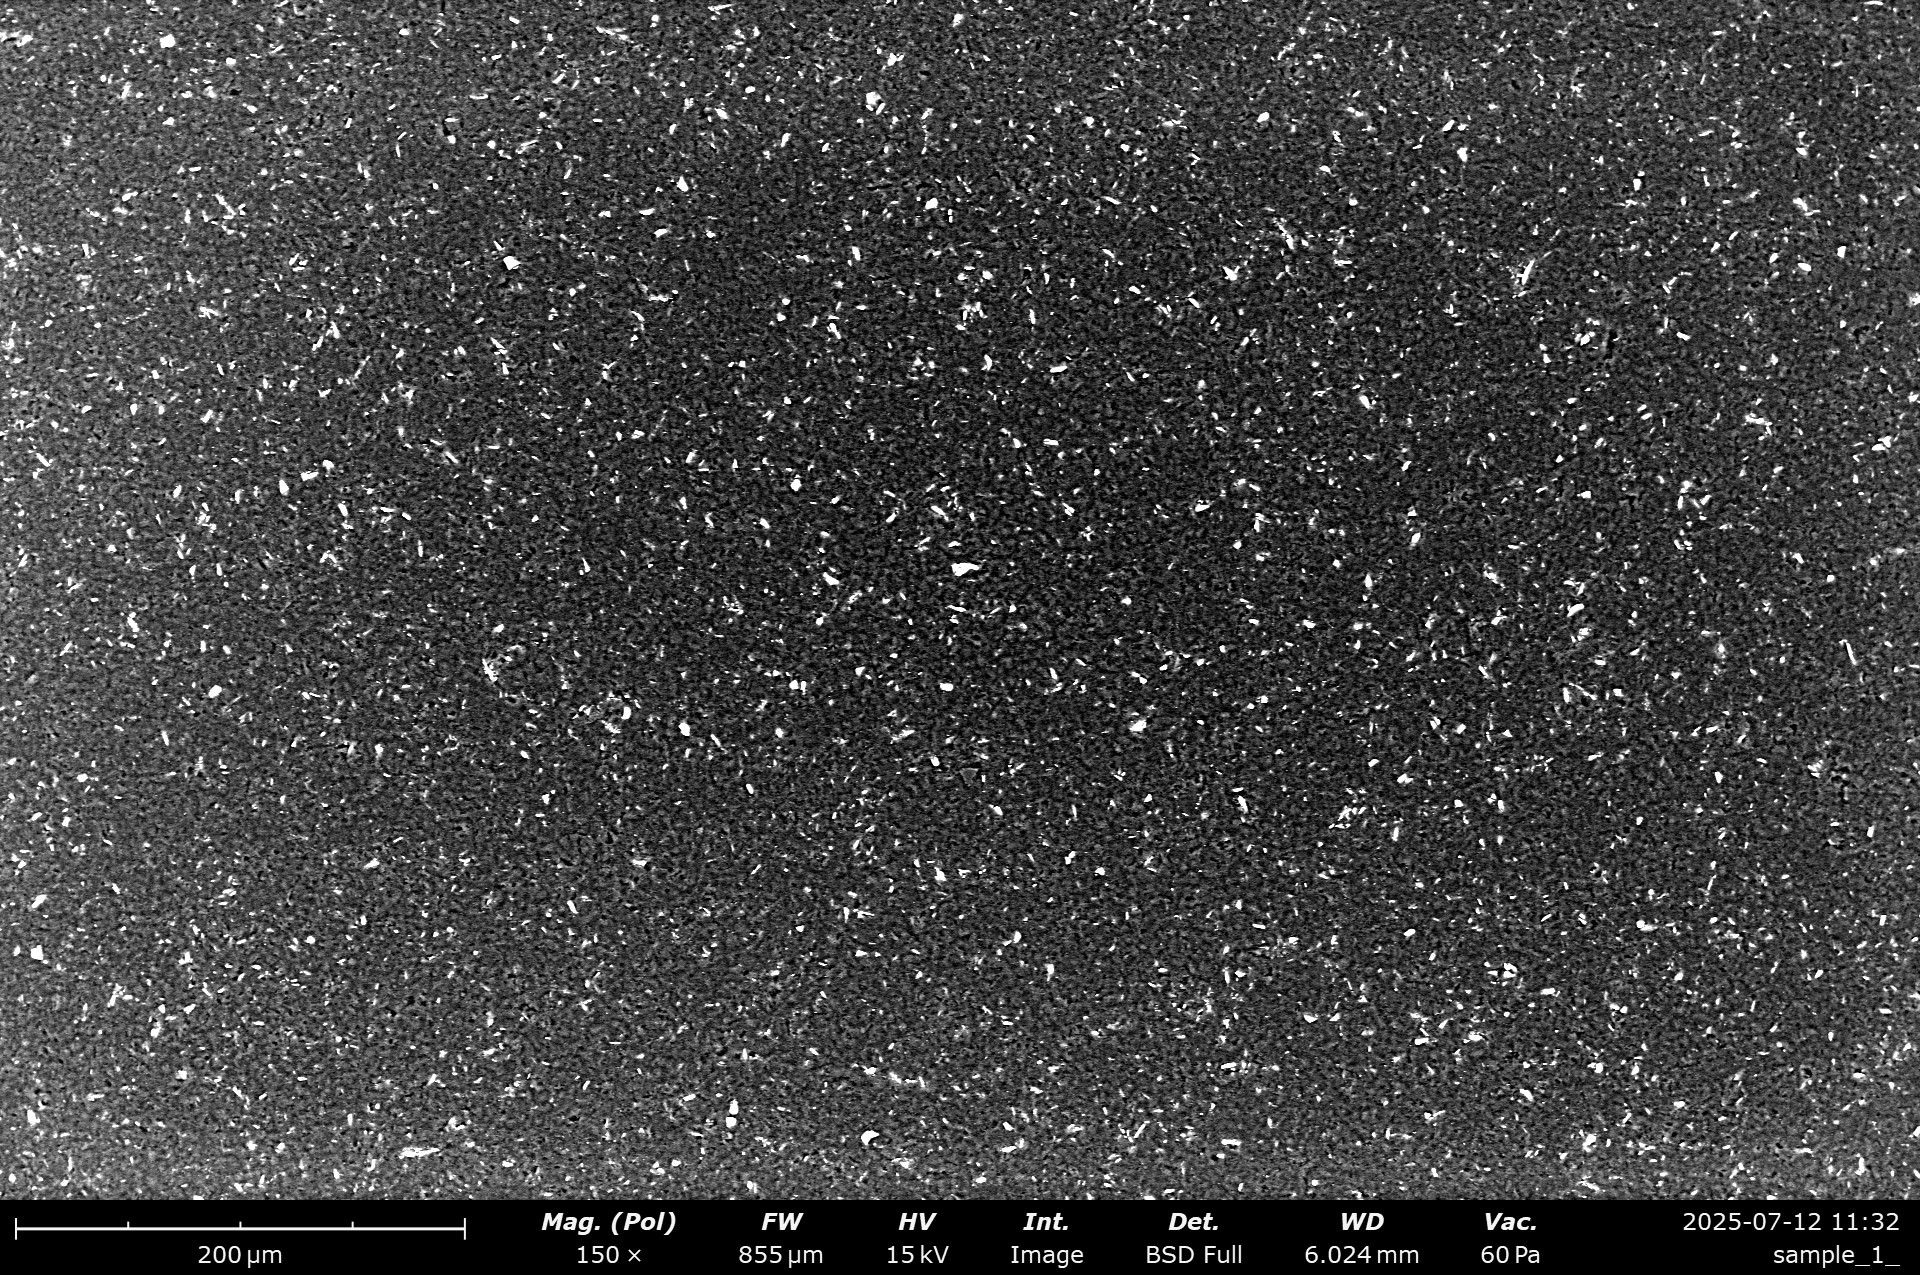
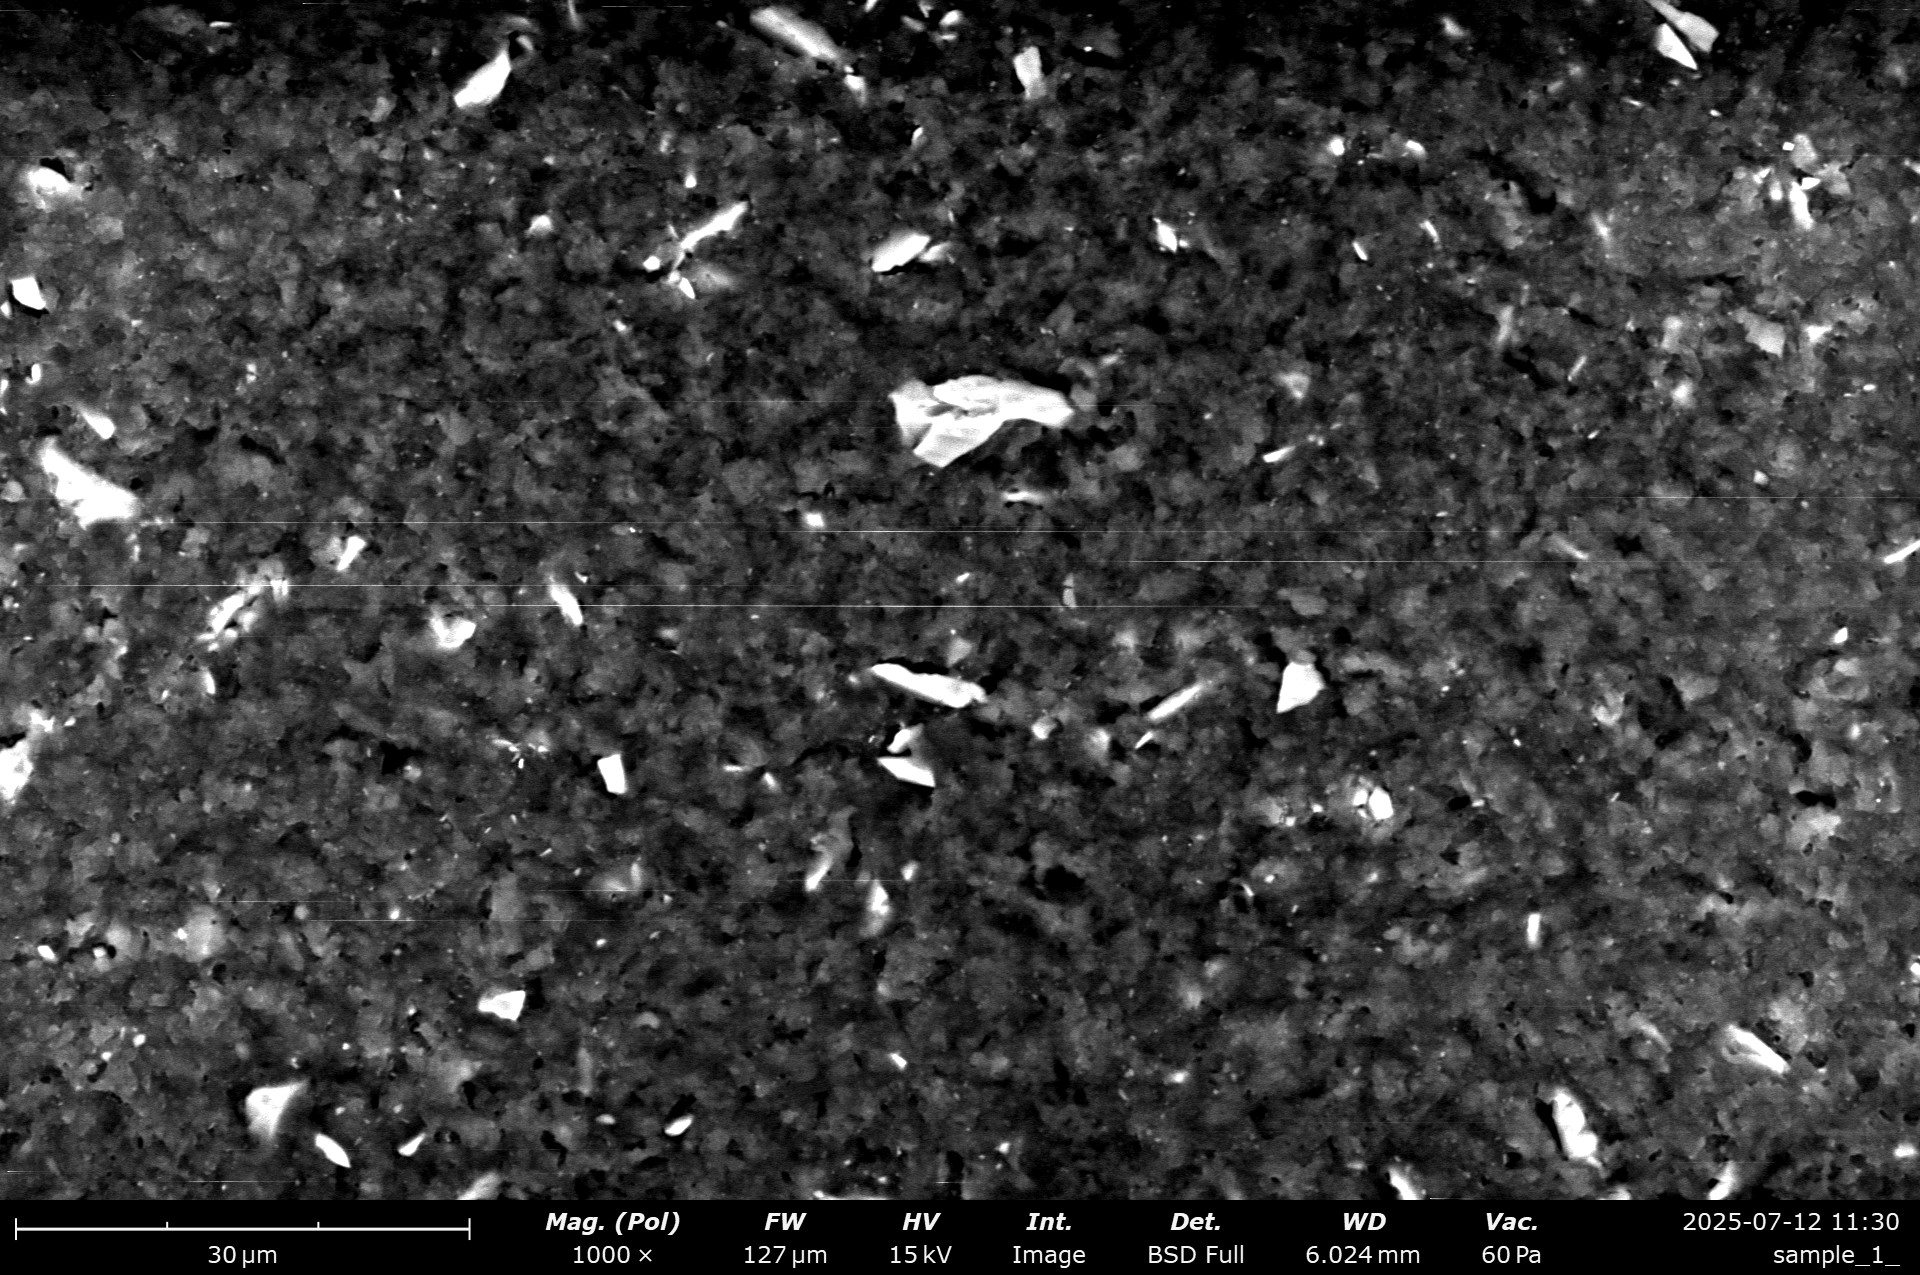
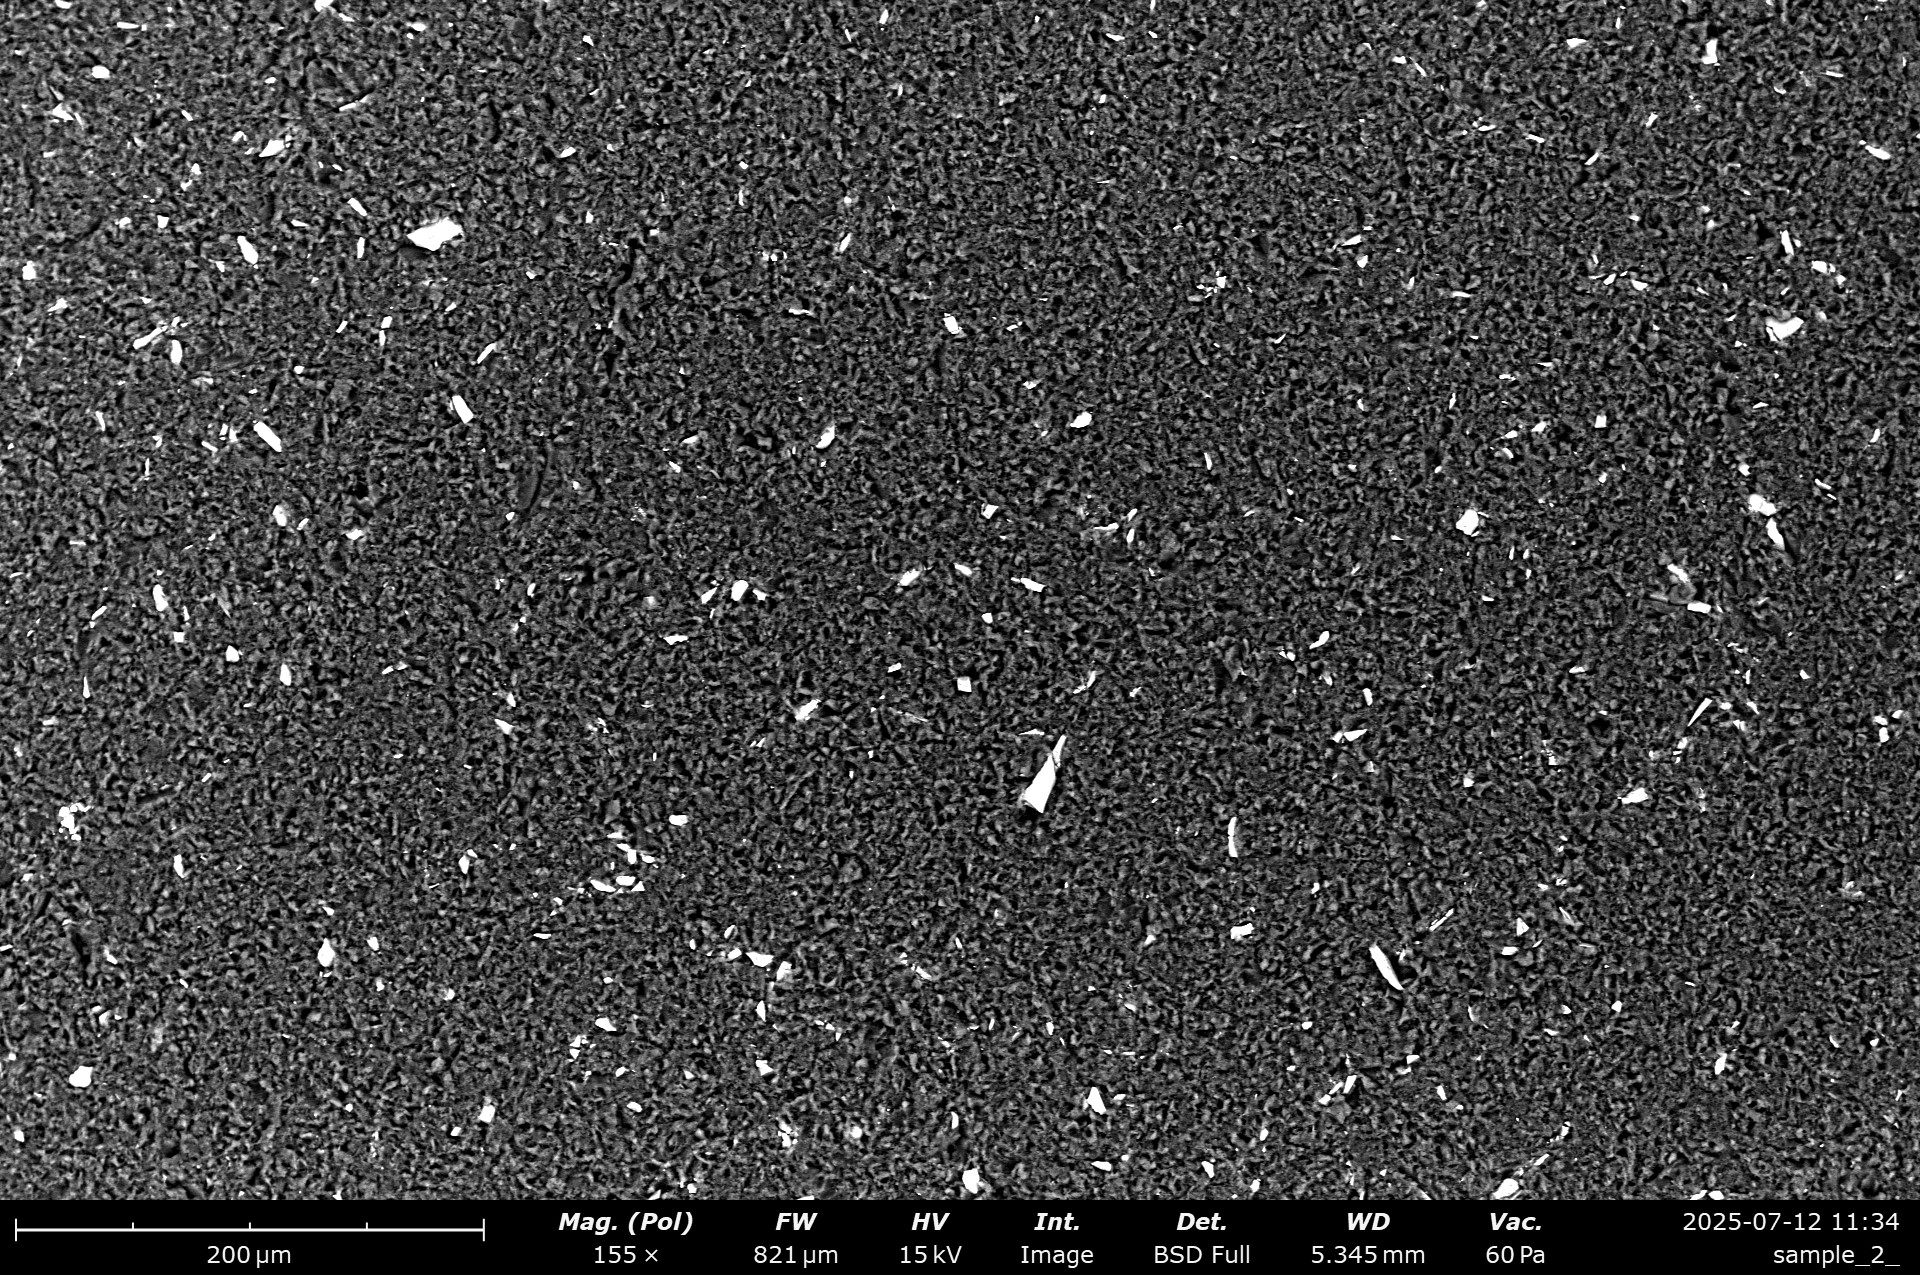
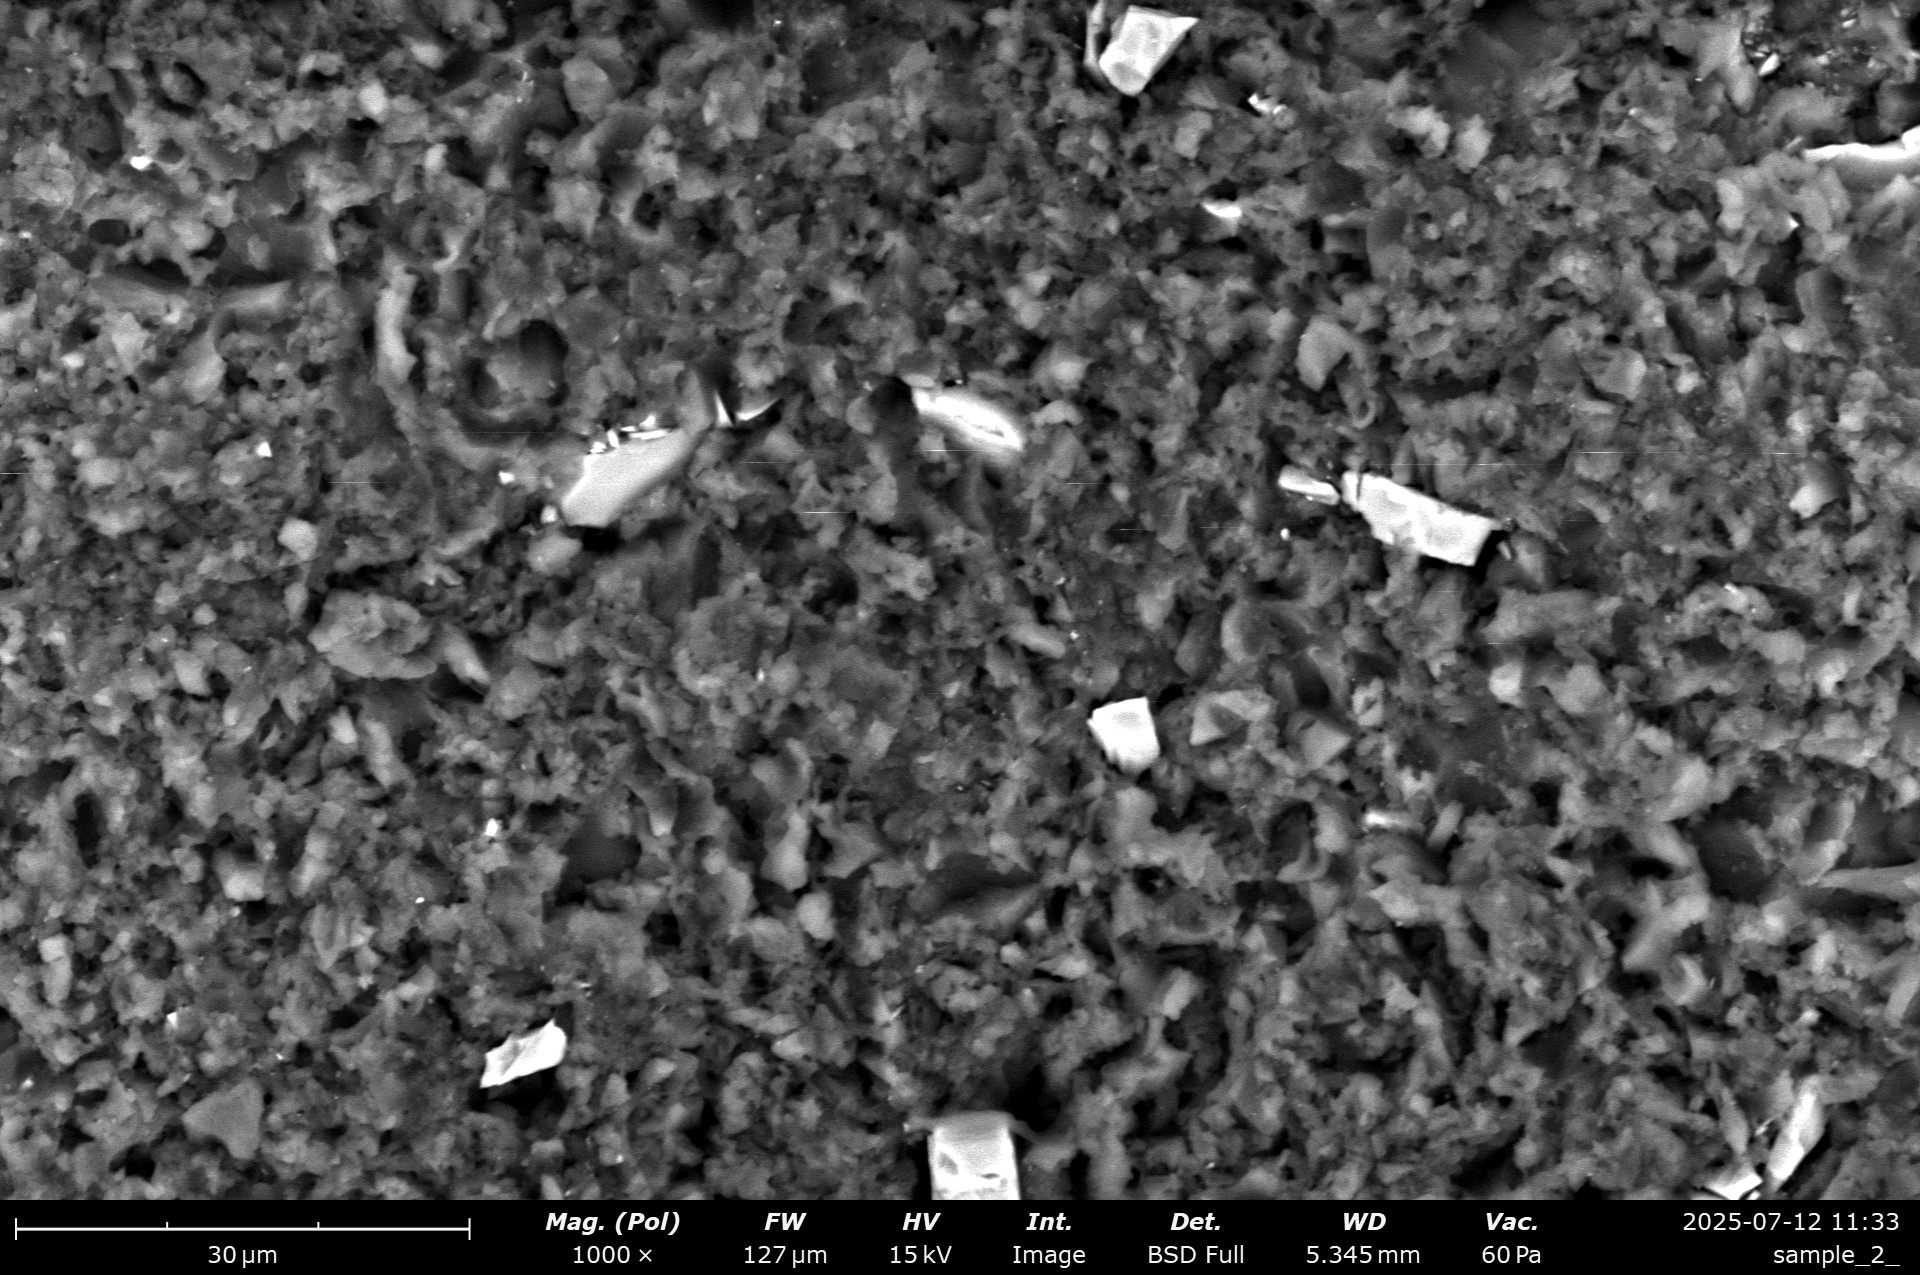
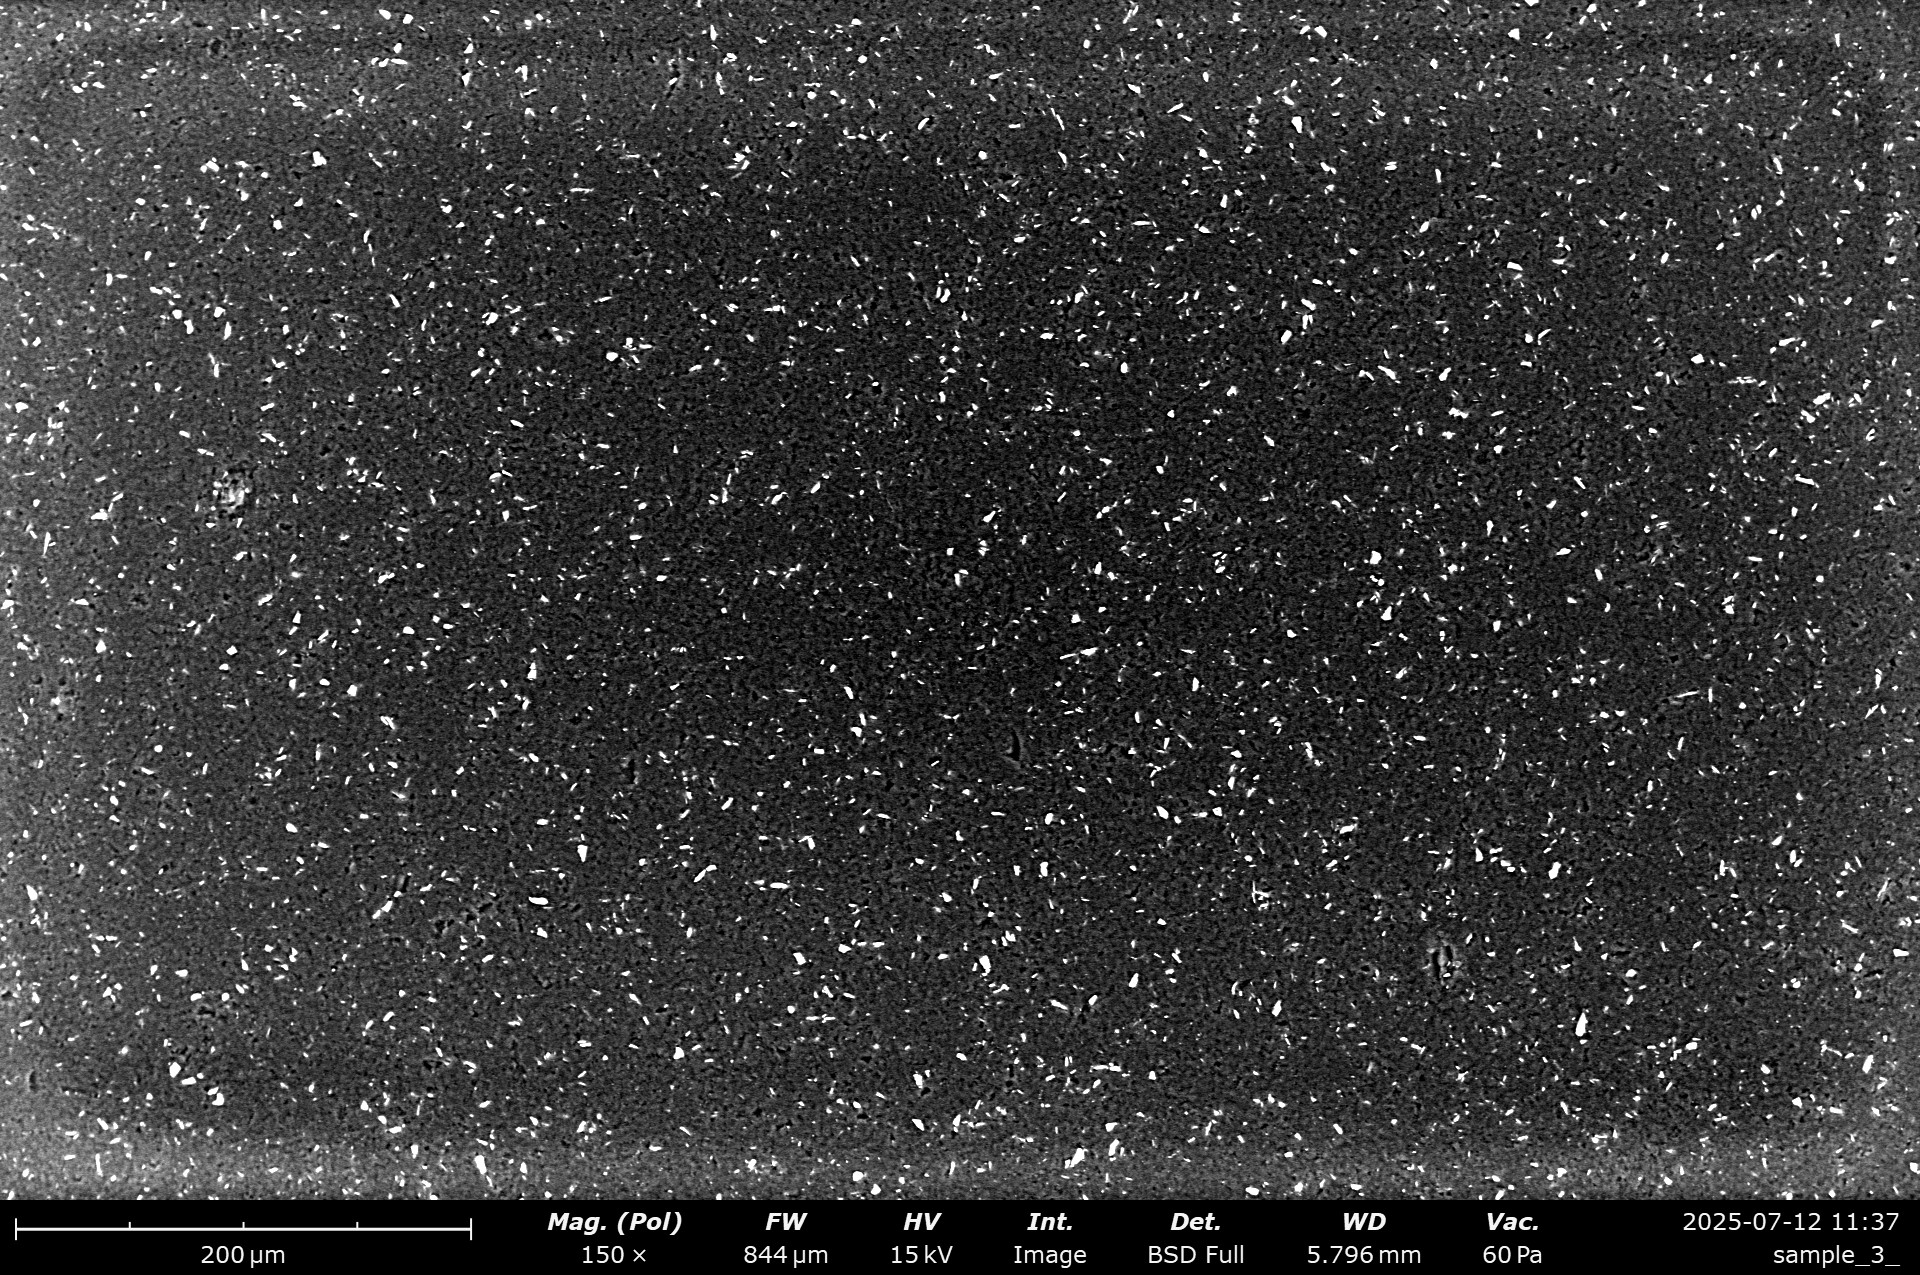
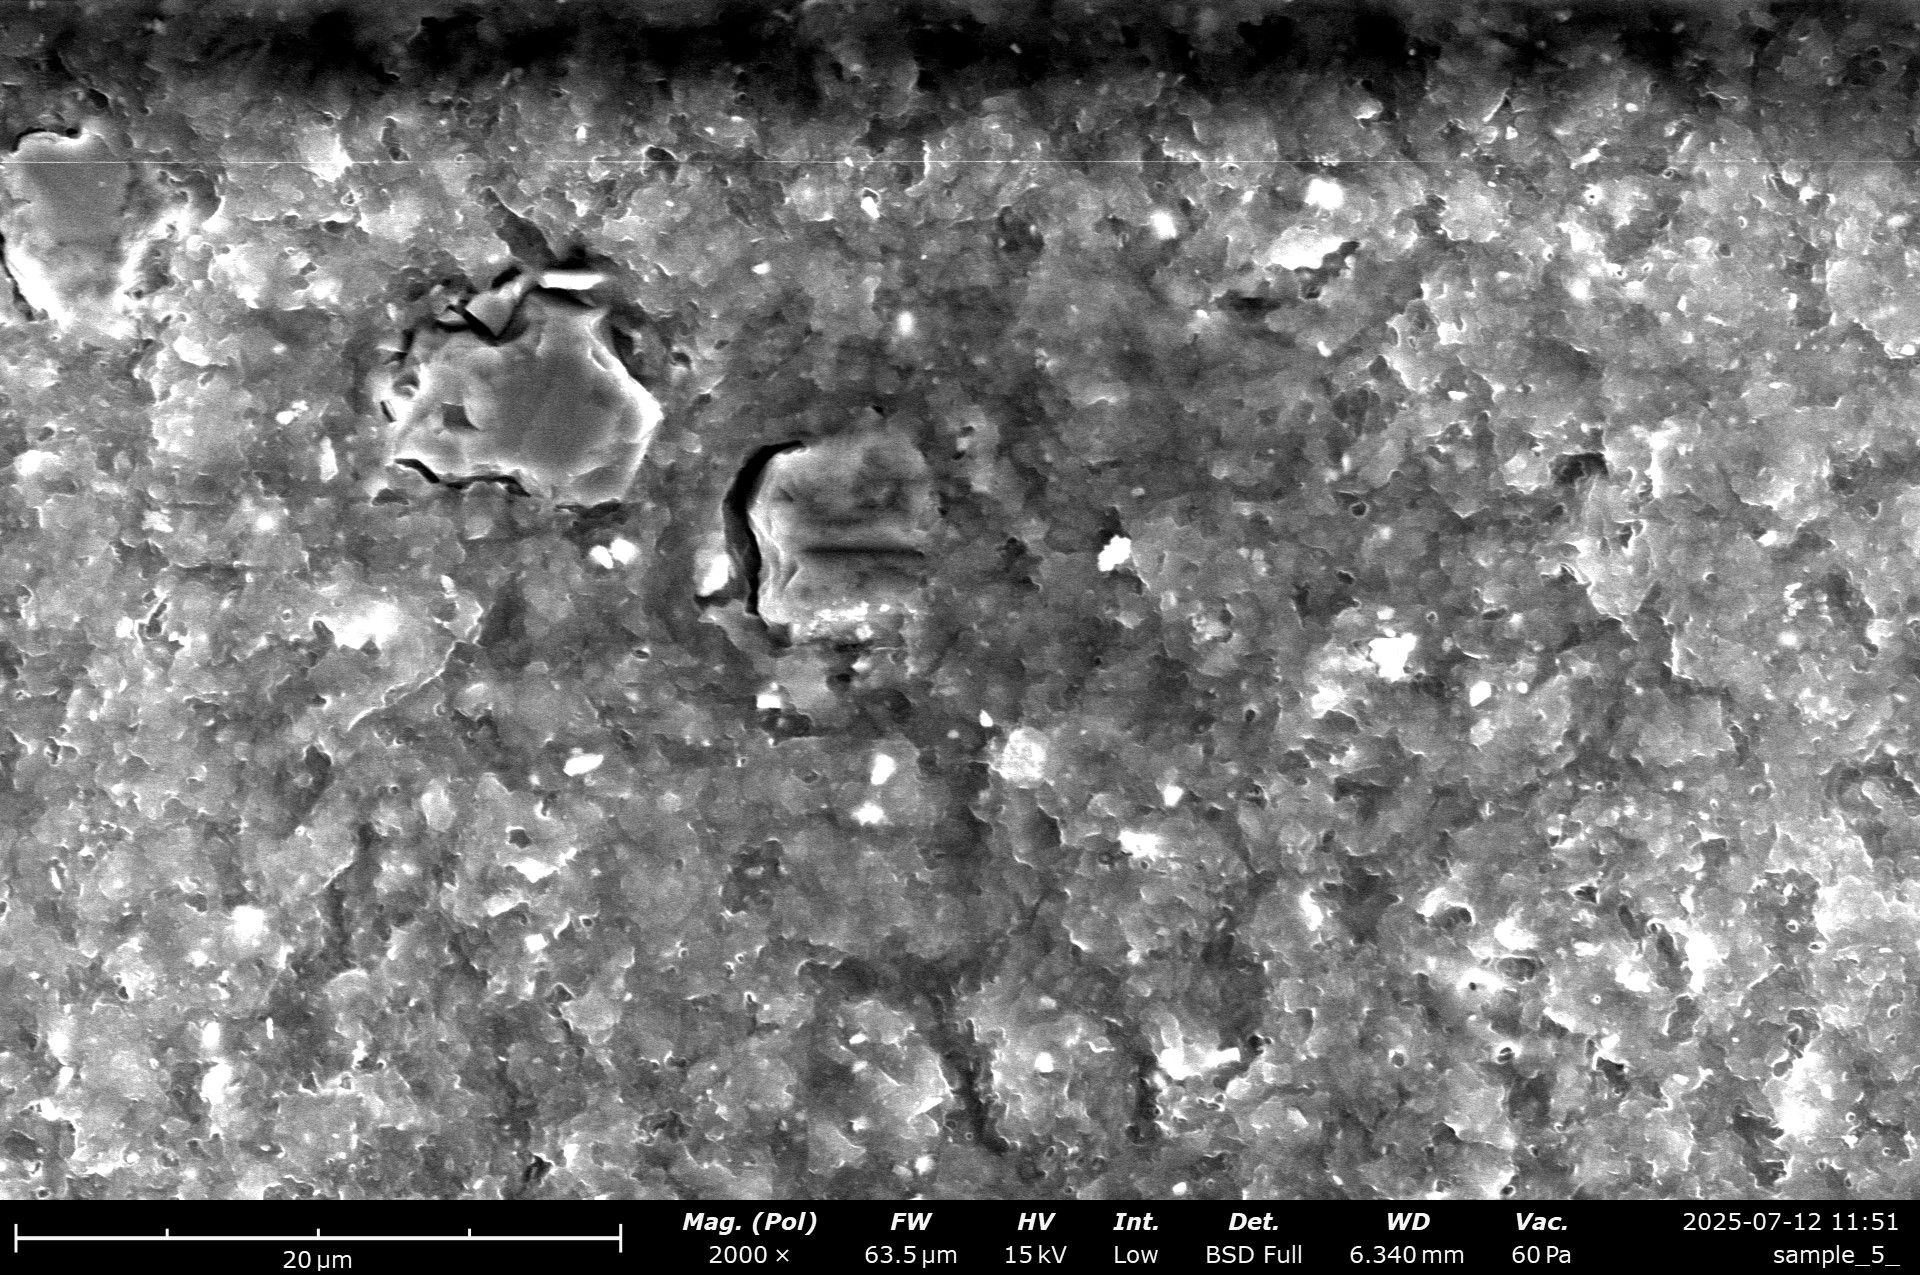
    SEM micrographs of the stone. Instrument: Zeiss GeminiSEM 560.

    Because this is a really coarse stone, I had to zoom out very far to actually image a relevant section 🙂 thankfully, our GeminiSEM 560 has an “overview” mode, where the field at the pole piece flares to allow for a much wider FOV than would typically be possible in such a high resolution SEM! There are massive, very smooth grains inside the SEM. Those are the white ones we identified earlier. Moreover, there is some large, very angular grains, that probably are the SiC, as well as a lower amount of blocky diamond grains. The binder itself is flakey and uneven, but not unexpectedly so for such a coarse stone.

    Let’s look at the chemical composition! For this we are going to use an advanced SEM technique called EDS. If you want to know more about this, I’ve written extensively about SEM microanalysis here on this blog.

    EDS analysis of the stone. Instrument: Oxford Ultim Max  ∞ 40mm2 EDS sensor. Note that our EDS sensor doesn’t show elements lighter than boron.

    This is quite surprising! The white particles are Zirconium-oxide, a technical ceramic that is often used for teeth replacements, but also analytical parts. It’s a cool material – but I’m unsure about it’s suitablility as a grinding abrasive, seeing that it’s hardness is quite low – much lower than Al2O3, SiC, CBN or diamond. We can also identify some SiC particles, and a wild mix of other oxide ceramics. It kind of feels like they took everything they had lying around and put it into a grinding stone? Very surprising!

    In order to evaluate the sharpening performance and material removal mode of this stone, a blade was sharpened with it. I am using a standardised testing procedure, read about it hereNevertheless, it’s 65 HRC M398, and sharpened to 17 DPS with resin bond diamond stones down to 10 µm. Afterwards, the tested stone is used, first in a back and forth movement until the surface becomes homogenous, and then alternating strokes (5-5-3-2) on each side, for a total of 20 strokes towards the apex per side. No pressure is applied but the weight of the apparatus.

    The edge is then analysed in the electron microscope for breakouts and morphological appearance.

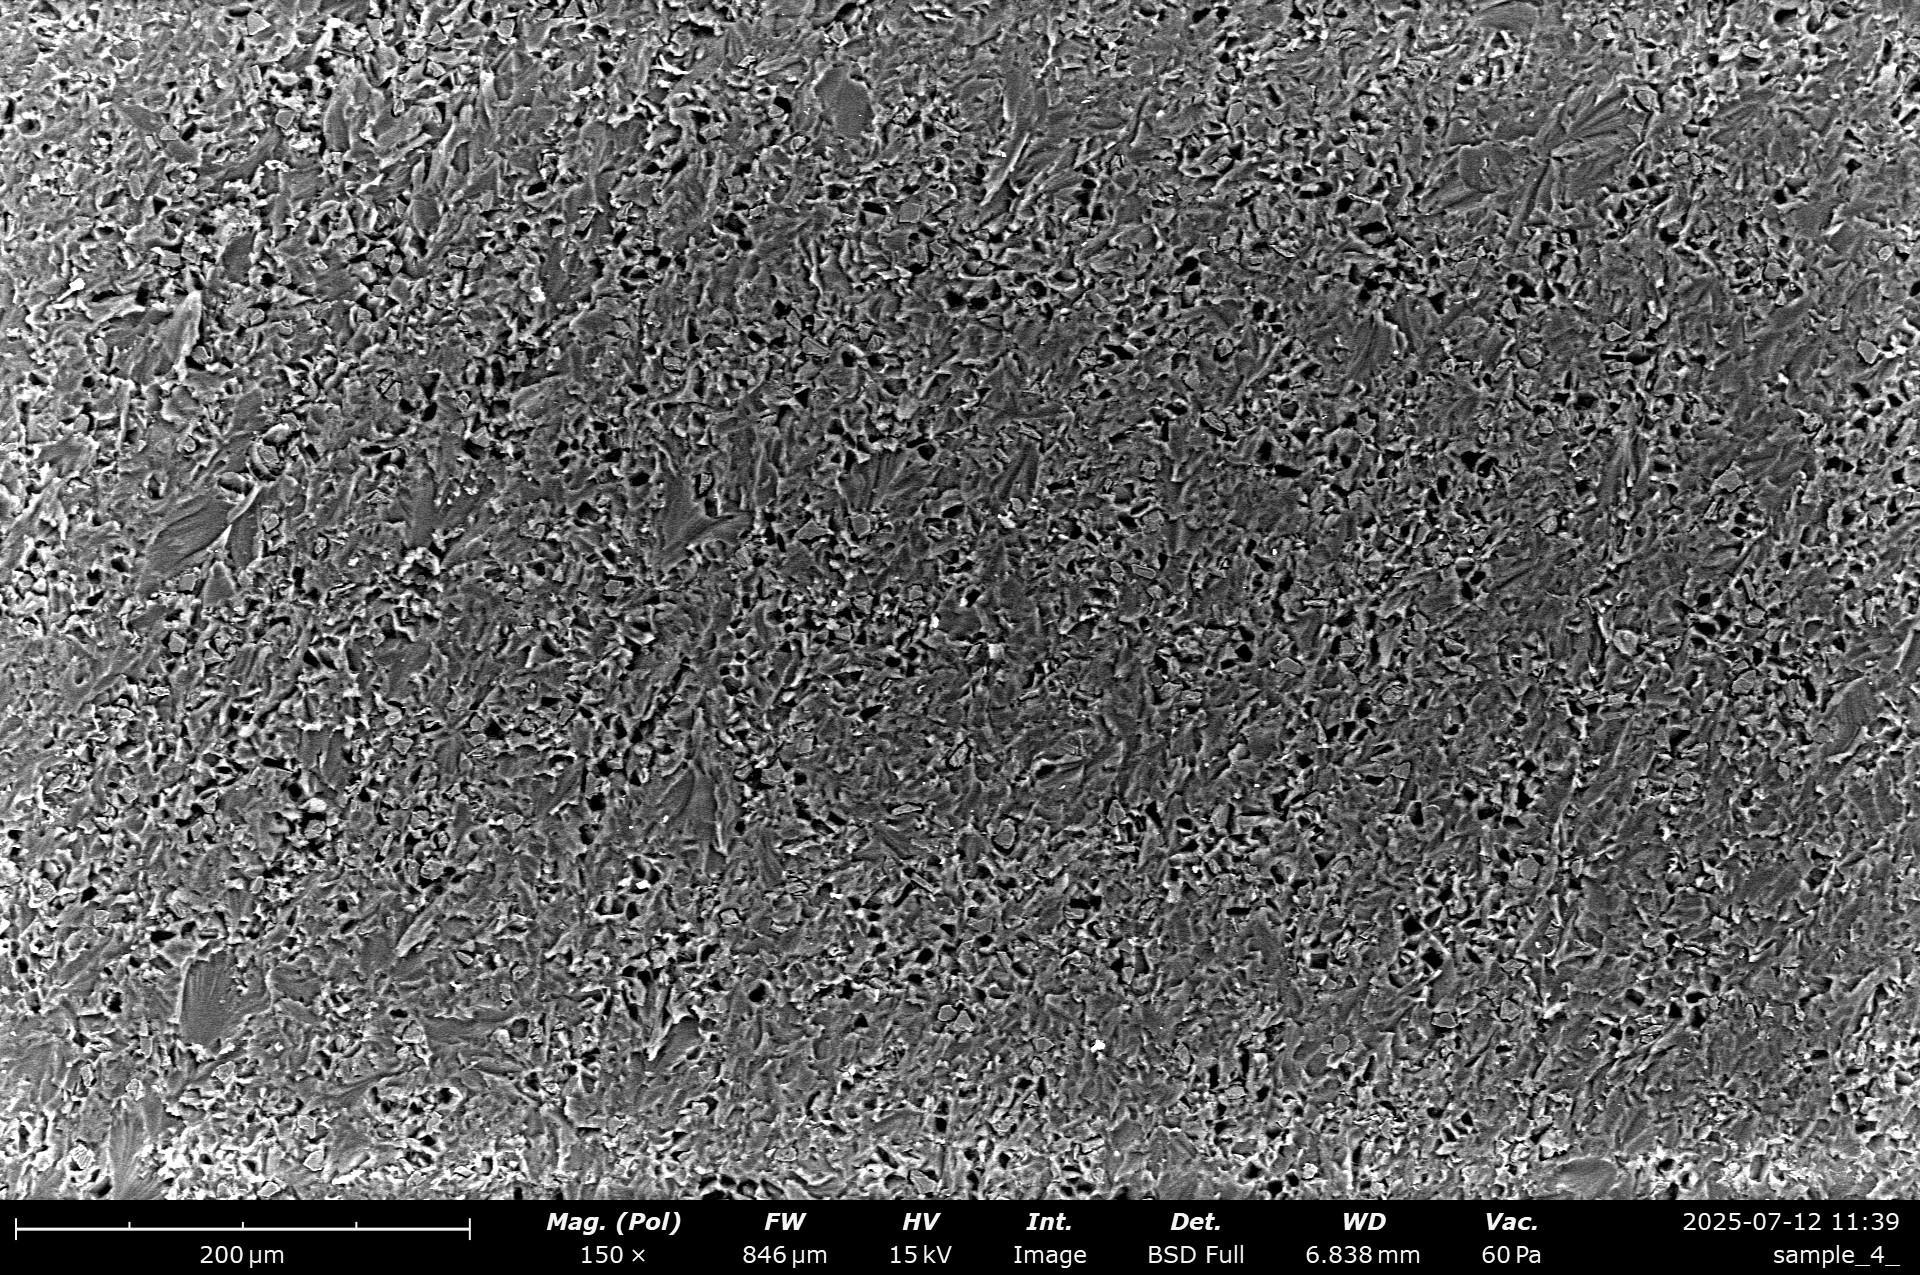
    SEM micrographs of the edge finished with the TSPROF Alpha 120 stone. Instrument: Thermo Fischer PhenomXL SEM.

    The TSPROF Alpha 120 did produce a massive burr. The surface is quite rough, with many very deep scratches. I have to say that the material removal rate was extraordinary – this felt very much like what typical EP stones with similar grain size can do! The massive, formed burr, as well as the surface morphology point towards dull grains, that burnish and deform besides the cutting action.

    For comparisons sake, I’ve taken pictures with a TSPROF electroplated F150 stone:

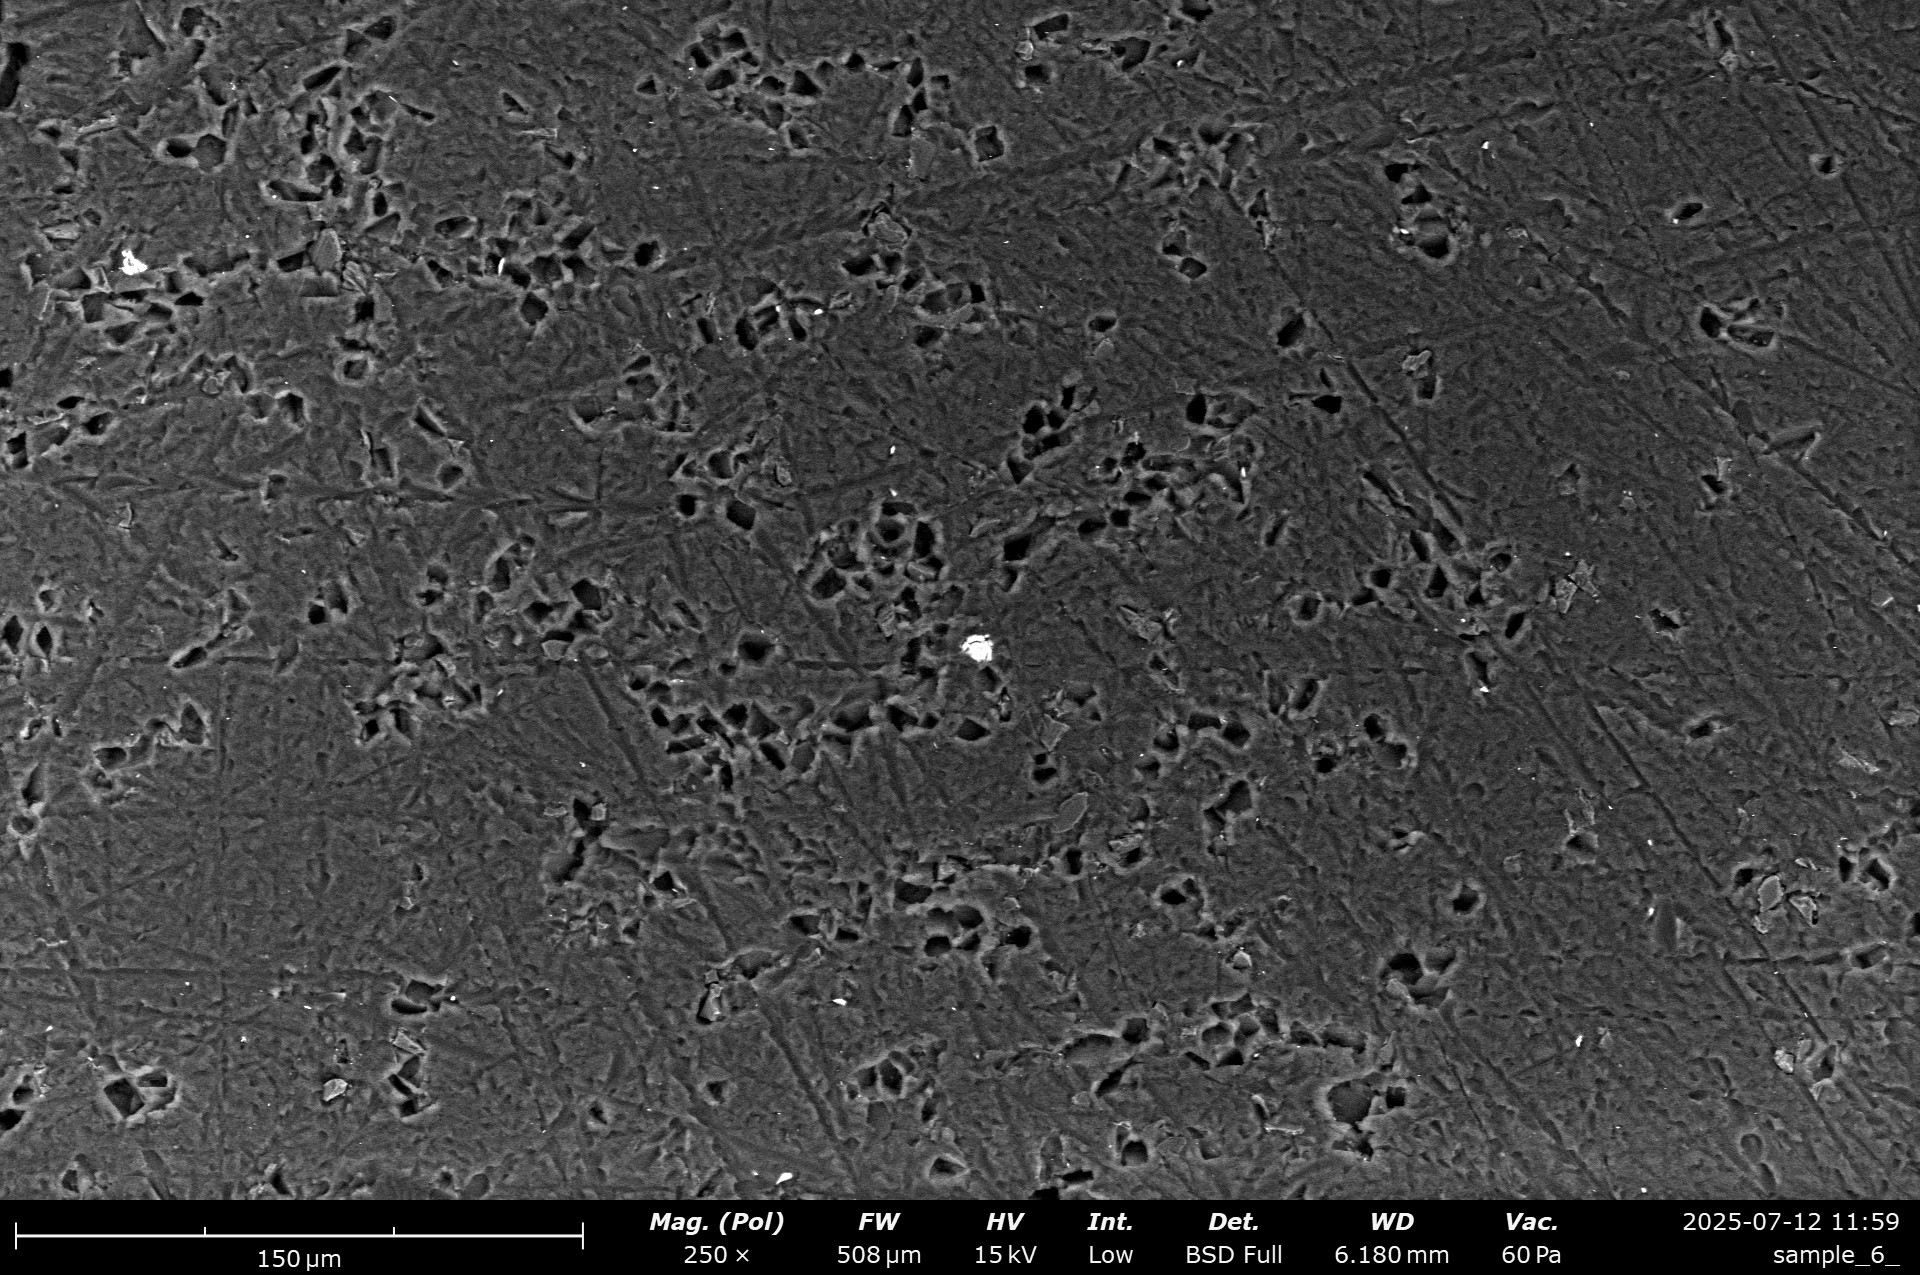
    SEM micrographs of the edge finished with the TSPROF EP F150 stone. Instrument: Thermo Fischer PhenomXL SEM.

    We can see a finer surface, with a less pronounced burr. Material removal rate felt comparable, but feedback was less smooth and more jagged.

    To compare whether this is the binder, I quickly made a really coarse Dr. Marv stone – 120 µm! It showed an even greater material removal rate than the Alpha 120. Let’s take a look at what an edge produced solely by diamonds looks like:

    SEM micrographs of the edge finished with a prototype Dr. Marv’s Scientific Sharpening stone (120 µm). Instrument: Thermo Fischer PhenomXL SEM.

    A much smoother surface, more regular edge and clean cutting action with little prow formation or burnishing. While I understand the motivation to use other abrasives to stabilise a resin bond, I’m unsure that ZrO2 is a good choice for this!

    Overall, the TSPROF Alpha 120 performs like a file: it removes material very quickly, even in hard and modern powder steels like the M398 used here. I’m unsure it’s worth the premium over an EP stone, and I think this stone is quite coarse – you would have to spend an excessive amount of time to remove the very deep scratches. The general rule of thumb is “depth of a scratch is half the width visible”.

    Sharpening disclaimer: I use a standardised approach to sharpening, which basically follows how most manufacturer of guided systems tell you to use this system. I am very aware, that every stone could perform much better than this, in terms of sharpness, but I want a comparable approach. The sharpening segment mostly shows the material removal mechanism – is it burnishing? is it cutting? is the cutting pressure too high so that carbides crack? Is there massive burr or prow formation? The BESS value definitely doesn’t highlight the ultimate sharpening performance of the stone, but was an often requested information. Over time, this blog will show BESS values for different edge morphologies, but by the holy endmill – don’t read it as a „this is the max value this stone can achieve“. I would also suggest to familiarise yourself with the works of Immanuel Kant, it’s absurd I need to write such a disclaimer here.

  • A brief study on sharpening stones – Part 18 – Venev OSB 2 resin stone – 3 µm

    This is part of a series of blog posts – looking into the appearance and composition of commercially available sharpening stones. If you are interested in the previous episodes, check out the archive for them.

    If you have some suggestion on what I should look at next, or want to share your super secret DIY stones, I could be persuaded to open the bag of analytical devices… hit me up on Instagram under @marvgro for that.

    Disclaimer: I’m not for sale. Every review you see on this blog is bought with my own money. I have no affiliation to any manufacturer.

    Review

    Today’s sharpening stone is another Venev stone. I’ve previously looked at their double sided one, but the resin and actual bond type was a bit weird under the SEM. Some very nice people messaged me and suggested I should order a specifically OSB2 declared one – which is apparently a very novel, high-tech bond, specifically designed for sharpening! That’s interesting for sure!

    Optical micrographs of the Venev OSB2 Resin 3 µm stone. Instrument: Leica Emspira

    Something that immediately hits is that this stone seems to have a mix between light regions, dark regions and dark particles. I fear for the worst…so let’s take a look under the SEM to identify what it is!

    SEM micrographs of the Venev OSB2 resin 3 µm diamond stone. Instrument: Zeiss GeminiSEM 560.

    We can make out several, very large particles in the top surface layer. The diamond concentration looks to be higher than on the other Venev stone we review, but agglomerates to small nests. The resin itself is flakey and very fine! No bubbles or larger porosity is visible. The surface topography is quite uneven for an artificial and factory dressed stone though.

    Let’s look at the chemical elements! For this we are going to use an advanced SEM technique called EDS. If you want to know more about this, I’ve written extensively about SEM microanalysis here on this blog.

    EDS analysis of the Venev OSB2 Resin stone. Instrument: Oxford Ultim Max  ∞ 40mm2 EDS sensor. Note that our EDS sensor doesn’t show elements lighter than boron.

    Surprisingly, there’s a massive amount of silicon carbide and magnesium oxide to be found in the composition of this sharpening stone! Basically all larger particles are foreign particles. Because it’s two different species, I hesitate to attribute these to the factory dressing process. I think one of the two is a filler to make the abrasive matrix harder, but also lower cost by requiring less diamond powder.

    3D surface height map of the Venev OSB2 stone. Instrument: Bruker Alicona µCMM, 50X objective lens, 3×3 FOV high resolution focus variation scan. Data is leveled and outliers removed (0.25%).

    The previously seen large height differences in the topography can be seen under the confocal focus variation microscope, too. A height difference of several microns make this the most uneven stone we’ve had so far on the blog, by far beating out all natural stones! This is also reflected in the ISO 25178 parameters, where large values for Sa, Sq and Smc dominate:

    ISO 25178 parameters.

    In order to evaluate the sharpening performance and material removal mode of this stone, a blade was sharpened with it. I am using a standardised testing procedure, read about it hereNevertheless, it’s 65 HRC M398, and sharpened to 17 DPS with resin bond diamond stones down to 10 µm. Afterwards, the tested stone is used, first in a back and forth movement until the surface becomes homogenous, and then alternating strokes (5-5-3-2) on each side, for a total of 20 strokes towards the apex per side. No pressure is applied but the weight of the apparatus.

    The edge is then analysed in the electron microscope for breakouts and morphological appearance.

    SEM micrographs of the edge finished with the Venev OSB 2 resin stone. Instrument: Thermo Fischer PhenomXL SEM.

    The edge has a smooth, regular appearance with a couple of deeper scratches. While sharpening, the stone has quite a bit of feedback – with this I mean resistance. It feels a bit sticky and shows a surprising amount of friction. The edge is slightly blunted in some sections, and some cracking can be observed. The stone barely removed any swarf. This edge BESS tested to 124.

    Optical micrographs of the edge finished with the Venev OSB 2 resin stone. Instrument: Leica Emspira

    Sharpening disclaimer: I use a standardised approach to sharpening, which basically follows how most manufacturer of guided systems tell you to use this system. I am very aware, that every stone could perform much better than this, in terms of sharpness, but I want a comparable approach. The sharpening segment mostly shows the material removal mechanism – is it burnishing? is it cutting? is the cutting pressure too high so that carbides crack? Is there massive burr or prow formation? The BESS value definitely doesn’t highlight the ultimate sharpening performance of the stone, but was an often requested information. Over time, this blog will show BESS values for different edge morphologies, but by the holy endmill – don’t read it as a „this is the max value this stone can achieve“. I would also suggest to familiarise yourself with the works of Immanuel Kant, it’s absurd I need to write such a disclaimer here.

  • A brief study on sharpening stones – Part 17 – Nano Hone 3 µm resin stone

    This is part of a series of blog posts – looking into the appearance and composition of commercially available sharpening stones. If you are interested in the previous episodes, check out the archive for them.

    If you have some suggestion on what I should look at next, or want to share your super secret DIY stones, I could be persuaded to open the bag of analytical devices… hit me up on Instagram under @marvgro for that.

    Disclaimer: I’m not for sale. Every review you see on this blog is bought with my own money. I have no affiliation to any manufacturer.

    Review

    Today’s sharpening stone is the Nano Hone 3 µm one. Nano Hone is an American company created by a former Shapton employee (?), Harrelson “Hap” Stanley. They say he draws from 10 years of experience to manufacture sharpening products under the Nano Hone company now. Their homepage shows that they have a plethora of artificial, very neat looking products!

    A note on this stone: Finish and manufacturing on the blank holder, but also the resin patch is superb. The anodising, laser engraving and actual shape are top notch! Kudos from a manufacturing enthusiast.

    Let’s take a look at the resin under the microscope!

    Optical micrographs of the Nano Hone 3 µm resin stone. Instrument: Leica Emspira.

    The actual resin patch is very thin on this stone, without having measured I’d guess it at 1 mm. It looks to me like it’s glued to the holder. The surface is very smooth, some scratches are visible on the resin. The resin feels a lot softer than other resin stones. Because it is so thin, this is hard to judge and impossible to measure with my trusted Shore D hand measurement device. No distinct particles can be made out, but there is a certain sparkle to it – maybe the diamond?

    SEM micrographs of the Nano Hone 3 µm stone. Instrument: Zeiss GeminiSEM 560.

    A first look at this stone reveals a massively different composition. All resin stones we have reviewed so far appeared to be resin stones made from thermoplastic resins such as a phenolic base. This is the regular abrasive used in the industry – for example for resin bond grinding wheels. This one appears to be a cast, probably epoxy based resin? At the same time, the surface is super porous, with lots of voids. I am unsure how this was created – either the resin a large amount of micro bubbles, or maybe it is being extruded? Very curios!

    The SEM micrographs show some larger particles (in the size range of 10 µm), that are a lighter colour. This typically points towards a heavier element than carbon. If you take a closer look at the medium magnifications, you will make out a couple of diamond grains, although they are stuck deep in the resin and are very few. Before I speculate on this, let’s identify the large grains and look for other elements on this stone. This is done via EDS – if you are interested, I’ve written previously about SEM micro analysis and explained all of the techniques there.

    EDS analysis of the Nano Hone 3 µm resin stone. Instrument: Oxford Ultim Max  ∞ 40mm2 EDS sensor. Note that our EDS sensor doesn’t show elements lighter than boron.

    Surprisingly, the large, lighter coloured particles are aluminium oxide! I would expect that these stem from the manufacturing process, as they only seem to be in the top layer. The EDS analysis also reveals a couple of diamond grains that are just below the surface, as the interaction volume for EDS is much deeper than for imaging. We can see in the carbon channel, that the concentration is low, with a large tendency to agglomerate. I would expect that the finishing process that creates the smooth surface is also tearing out the diamond. The reason nearly no liquid-resin stones exist, is that the grain retention is super low on those resins, and we can see this exact thing happening here.

    Let’s take a look at this super smooth surface under a 3D optical profiler!

    White light interferometry height map of the Nano Hone 3 µm sized stone. Instrument: Zygo Nexview NX2, Objective Lens: 20X. Stitched overview of 3×3 images.

    We can see that the aluminium oxide particles sit just on top of the stone, and some deep scratches are visible. The rest of the surface is flat and shows some micro roughness. This is also reflected in the ISO 25178 parameters, that show a remarkable low roughness (Sq, Sa) for an abrasive stone:

    ISO 25178 parameters of the Nano Hone 3 µm stone.

    Let’s take a look at how this stone sharpens a blade!

    In order to evaluate the sharpening performance and material removal mode of this stone, a blade was sharpened with it. I am using a standardised testing procedure, read about it hereNevertheless, it’s 65 HRC M398, and sharpened to 17 DPS with resin bond diamond stones down to 10 µm. Afterwards, the tested stone is used, first in a back and forth movement until the surface becomes homogenous, and then alternating strokes (5-5-3-2) on each side, for a total of 20 strokes towards the apex per side. No pressure is applied but the weight of the apparatus.

    The edge is then analysed in the electron microscope for breakouts and morphological appearance.

    SEM micrographs of the edge sharpened with the Nano Hone resin stone. Instrument: Thermo Fischer PhenomXL.

    This stone was quite surprising. Initially, the glossy surface turned matte within a couple of strokes. After about 30 strokes, some gloss reappeared on the surface, but didn’t reach the level of the previous, Dr.Marv stone created, preparation. The SEM shows a multitude of super fine scratches – they are in a cross hatch pattern, as I sharpen first at about 30° until the complete previous surface finish is gone, and then I move the stone in the opposite angular direction. This makes sure, that the surface we look at is created by the reviewed stone. Here we can see that the micro scratches disappear the closer we get to the surface, and a very polished, I would even say burnished surface was created. This looks very much like the surface improvement if you strop on an unloaded leather strop.

    I would guess that the initial, matte surface is created by the aluminiumoxide particles embedded in the top layer. After a couple of passes, these are either pushed in deep, or become loose and accumulate on the blade with the arbasive debris from the cutting action, and the diamond starts cutting, creating a glossy finish again.

    This blade BESS tested in at 190. The final surface is glossy and regular to the naked eye:

    Sharpening disclaimer: I use a standardised approach to sharpening, which basically follows how most manufacturer of guided systems tell you to use this system. I am very aware, that every stone could perform much better than this, in terms of sharpness, but I want a comparable approach. The sharpening segment mostly shows the material removal mechanism – is it burnishing? is it cutting? is the cutting pressure too high so that carbides crack? Is there massive burr or prow formation? The BESS value definitely doesn’t highlight the ultimate sharpening performance of the stone, but was an often requested information. Over time, this blog will show BESS values for different edge morphologies, but by the holy endmill – don’t read it as a „this is the max value this stone can achieve“. I would also suggest to familiarise yourself with the works of Immanuel Kant, it’s absurd I need to write such a disclaimer here.

  • A brief study on sharpening stones – Part 16 – Boride 1000

    This is part of a series of blog posts – looking into the appearance and composition of commercially available sharpening stones. If you are interested in the previous episodes, check out the archive for them.

    If you have some suggestion on what I should look at next, or want to share your super secret DIY stones, I could be persuaded to open the bag of analytical devices… hit me up on Instagram under @marvgro for that.

    Disclaimer: I’m not for sale. Every review you see on this blog is bought with my own money. I have no affiliation to any manufacturer.

    Review

    Today’s stone is an artificial silicon carbide sharpening stone manufactured by BORIDE, a US company that specialises in polishing stones for mold work. This is the CS-HD type, according to the manufacturer a green silicon carbide rock that excels at polishing up to 63 HRC.

    Let’s take a look under the microscope!

    Optical micrographs of the Boride CS-HD 1000 stone. Instrument: Leica Emspira.

    The manufacturer printed the grit size onto the stone, which is visible at large magnifications as black dots. I would expect this to be printed, as it looks like ink leaked into the small cracks of the surface. The overall stone material is a mix of different coloured particles.

    In order to make out more details, and look into the chemistry of the stone, we will do electron microscopy analysis. If you want to know more about this, I’ve explained the techniques in detail here.

    SEM micrographs of the Boride CS-HD 1000 stone. Note at high magnifications how the grains have grown into each other. Instrument: Zeiss Gemini 560.

    The stone shows a nice grain size distribution, with very regular shape. Green SiC is generally harder, but more brittle than black SiC. The BORIDE stones at higher grits show that green colour, at this size it is more an off-white colour, which stems from the particle size. At higher magnifications, the tendency to solid-phase sinter becomes apparent: the grains are interconnecting, which looks like they are melting into each other.

    EDS analysis of the BORIDE CS-HD stone. Instrument: Oxford Ultim Max  ∞ 40mm2 EDS sensor. Note that our EDS sensor doesn’t show elements lighter than boron.

    The EDS analysis shows that this artificial stone is mostly SiC – the oxygen we see is probably surface oxidation, and the minuscule amounts of aluminium are probably aluminium oxide impurities. This is expected of every SiC, as typical purity for green SiC is 99%. No large, impure particles can be found, which speaks for proper abrasive hygiene at the manufacturer!

    Instrument: Bruker Alicona µCMM, 50X objective lens, 3×3 FOV high resolution focus variation scan. Data is leveled and outliers removed (0.25%).

    Analysing the surface via focus variation microscopy, we can see that the matte, smooth appearance is mirrored in the surface roughness. The stone is unremarkable, with no distinct material ratio or deep voids. This is also reflected in the ISO 25178 parameters:

    ISO 25178 parameters.

    Let’s take a look at how this stone sharpens a blade!

    In order to evaluate the sharpening performance and material removal mode of this stone, a blade was sharpened with it. I am using a standardised testing procedure, read about it hereNevertheless, it’s 65 HRC M398, and sharpened to 17 DPS with resin bond diamond stones down to 10 µm. Afterwards, the tested stone is used, first in a back and forth movement until the surface becomes homogenous, and then alternating strokes (5-5-3-2) on each side, for a total of 20 strokes towards the apex per side. No pressure is applied but the weight of the apparatus.

    The edge is then analysed in the electron microscope for breakouts and morphological appearance.

    SEM micrographs of the blade sharpened with the BORIDE CS-HD stone. Instrument: Thermo Fischer PhenomXL

    The boride stone created a matte, homogeneous surface. Under the SEM, lot’s of micro scratches as well as some deeper scratches with burr formation are visible. Near the apex, small foil type burrs can be found.

    The stone provided a very regular feedback – it felt like every position on it is identical, with a smooth, even friction feedback. The blade surface showed a lot of scratches, some very horizontal – I could imagine that this stems from me wipping down the blade and rubbing a particle across it. I would ignore those!

    This edge BESS tested in at 197.

    Optical micrograph of the sharpened blade. The fine micro scratches, but also larger and deeper scratches are easily visible. Compared to the 5 µm resin stone, the surface visibly deteriorated.

    I think this is an OK stone. 1000 grit is not super fine, so I expected the surface to deteriorate. The stones are not super expensive, and I would guess with enough skill, they would present you with a fantastic edge. I just don’t see the appeal in a SiC based abrasive stone, when there are super abrasives out there like CBN or diamond, or fantastic natural stones like the yellow Belgian coticule.

    Sharpening disclaimer: I use a standardised approach to sharpening, which basically follows how most manufacturer of guided systems tell you to use this system. I am very aware, that every stone could perform much better than this, in terms of sharpness, but I want a comparable approach. The sharpening segment mostly shows the material removal mechanism – is it burnishing? is it cutting? is the cutting pressure too high so that carbides crack? Is there massive burr or prow formation? The BESS value definitely doesn’t highlight the ultimate sharpening performance of the stone, but was an often requested information. Over time, this blog will show BESS values for different edge morphologies, but by the holy endmill – don’t read it as a „this is the max value this stone can achieve“. I would also suggest to familiarise yourself with the works of Immanuel Kant, it’s absurd I need to write such a disclaimer here.

  • Protected: Dr. Marv’s Scientific Sharpening Stones – Instructions

    This content is password-protected. To view it, please enter the password below.

  • A brief study on sharpening stones – Part 15 – Akansas Stone (Novaculite)

    This is part of a series of blog posts – looking into the appearance and composition of commercially available sharpening stones. If you are interested in the previous episodes, check out the archive for them.

    If you have some suggestion on what I should look at next, or want to share your super secret DIY stones, I could be persuaded to open the bag of analytical devices… hit me up on Instagram under @marvgro for that.

    Disclaimer: I’m not for sale. Every review you see on this blog is bought with my own money. I have no affiliation to any manufacturer.

    Review

    Today’s stone is a natural stone, which is often called an Arkansas stone, from one of the regions where it is found. The actual mineral is called Novaculite, and is a microcrystalline configuration of silica. The stone I review was sold by a German sharpening supply stone and has the distinct and characteristic translucent grey colour. It’s a very interesting stone to me, as I have been using Arkansas stones for several years to deburr a fixture or vise at my professional day-job! They are very common in the German manufacturing world.

    Let’s take a look under the microscope!

    Optical micrographs of the Arkansas stone. Instrument: Leica Emspira 3.

    It’s a mostly homogenous stone, with some lighter coloured particles that conglomerate a bit together. A few black or dark particles are visible.

    SEM micrographs of the Arkansas stone. Instrument: Zeiss Gemini 560.

    The first thing that jumps out under the scanning electron microscope is how regular this stone is! We’ve had a couple of natural stones on this blog before, and most were a wild and inhomogeneous mix between flakey matrix and small abrasive grains. Meanwhile here, the stone consists out of an uncountable amount of small, blocky grains. Because of this structure, the mineral novaculite is considered a microcrystalline one, which also explains the artificial “grit size” many vendors assign to this type.

    EDS analysis of the Arkansas stone. Instrument: Oxford Ultim Max  ∞ 40mm2 EDS sensor. Note that our EDS sensor doesn’t show elements lighter than boron.

    The EDS analysis shows what we expect – the mineral novaculite is quartz after all, so an abundance of Si and O can be found in this analysis. Quite a bit of carbon and a trace amount of iron can be found. I would guess that this stems from the manufacturing process and probably the transport / storage as well.

    Let us now take a look at the surface topography!

    Instrument: Bruker Alicona µCMM, 50X objective lens, 3×3 FOV high resolution focus variation scan. Data is leveled and outliers removed (0.25%).

    The stone has a high surface ratio and is quite smooth. This correlates to the feel of it during sharpening – especially with a bit of oil, it is gliding with very little resistance back and forth. Because of a couple of high spots, there is some microvibrating feedback expected.

    ISO 25178 parameters.

    Let’s take a look at how this stone sharpens a blade!

    In order to evaluate the sharpening performance and material removal mode of this stone, a blade was sharpened with it. I am using a standardised testing procedure, read about it hereNevertheless, it’s 65 HRC M398, and sharpened to 17 DPS with resin bond diamond stones down to 10 µm. Afterwards, the tested stone is used, first in a back and forth movement until the surface becomes homogenous, and then alternating strokes (5-5-3-2) on each side, for a total of 20 strokes towards the apex per side. No pressure is applied but the weight of the apparatus.

    The edge is then analysed in the electron microscope for breakouts and morphological appearance.

    SEM micrographs of the edge finished with the Arkansas stone. Instrument: Thermo Fischer PhenomXL SEM.

    The blade has a nice edge to it. Only at very high magnifications, micro burring becomes prominent. A couple of deeper scratches are created, as well as some prow formation on the side of these. As with most natural stones, the large size distribution of the abrasive particles can sometimes produce exceptional results, but also give you periodic deep scratches. Nevertheless, the Arkansas stone created a very nice, homogenous surface finish that approaches a glossy mirror finish. The blade itself was just barely sharp enough to shave and tested in at around 140 BESS. Compared to the yellow Belgian coticule (which I loved!) from the last blog entry, I would say that this stone is much harder, does more of a burnishing action with less material removed and leaves a rougher finish. I will continue to use these for deburring fixtures for the CNC machine, but I don’t think this will become my favourite for sharpening!

    Sharpening disclaimer: I use a standardised approach to sharpening, which basically follows how most manufacturer of guided systems tell you to use this system. I am very aware, that every stone could perform much better than this, in terms of sharpness, but I want a comparable approach. The sharpening segment mostly shows the material removal mechanism – is it burnishing? is it cutting? is the cutting pressure too high so that carbides crack? Is there massive burr or prow formation? The BESS value definitely doesn’t highlight the ultimate sharpening performance of the stone, but was an often requested information. Over time, this blog will show BESS values for different edge morphologies, but by the holy endmill – don’t read it as a „this is the max value this stone can achieve“. I would also suggest to familiarise yourself with the works of Immanuel Kant, it’s absurd I need to write such a disclaimer here.

  • A brief study on sharpening stones – Part 14 – Yellow Belgian Coticule

    This is part of a series of blog posts – looking into the appearance and composition of commercially available sharpening stones. If you are interested in the previous episodes, check out the archive for them.

    If you have some suggestion on what I should look at next, or want to share your super secret DIY stones, I could be persuaded to open the bag of analytical devices… hit me up on Instagram under @marvgro for that.

    Disclaimer: I’m not for sale. Every review you see on this blog is bought with my own money. I have no affiliation to any manufacturer.

    Review

    Today’s sharpening stone is a natural stone. Belgian coticules are a very well renown grinding and sharpening stone. They are commonly found in the Ardennes region of Belgium in central Europe. It’s a sedimentary rock with a high content of very fine garnet, a hard silicate mineral. Hence their suitability for sharpening! Because yellow Belgian coticule is quite a mouthful, I’ll appreviate it as “YB” for the rest of the article. I’ve previously analysed blue Belgian coticule – find it in the archive .

    Optical micrographs of the “YB”. The magnification is visible in the lower right corner. Instrument: Leica Emspira.

    Surprisignly, the garnets in this stone are of a different colour than in the blue stone! Let’s take a look under the SEM:

    SEM micrographs of the “YB”. Instrument: Zeiss GeminiSEM560.

    This stone overall is much finer. The flakey particles are thinner, and the garnet grains are definitely in the single digit µm range. A high, dense surface is created.

    Let’s take it for an EDS analysis! If you are interested, I’ve written a brief introduction into the different analytical techniques of the SEM here.

    EDS analysis of the “BB”. Instrument: Oxford Ultim Max  ∞ 40mm2 EDS sensor. Note that our EDS sensor doesn’t show elements lighter than boron.

    I’ve written a bit about the possible chemical composition of garnets on the previous post, and there is fantastic research out there. Maybe more interesting here is the direct comparison of yellow and blue coticule from the same manufacturer:

    EDS composition of BB (left/first picture) and YB (right/second picture)

    The YB shows a much lower content of iron (1.2 vs 4.3%), with slightly higher levels of Mg and Al.

    Let us now take a look at the surface topography!

    Instrument: Bruker Alicona µCMM, 50X objective lens, 3×3 FOV high resolution focus variation scan. Data is leveled and outliers removed (0.25%).

    The surface is smooth, even and shows an exceptional amount of material ratio at the top!

    ISO 25178 parameters.

    The ISO 25178 parameters confirm this – it is smoother, finer and more even than the BB stone reviewed in the last blog entry.

    In order to evaluate the sharpening performance and material removal mode of this stone, a blade was sharpened with it. I am using a standardised testing procedure, read about it hereNevertheless, it’s 65 HRC M398, and sharpened to 17 DPS with resin bond diamond stones down to 10 µm. Afterwards, the tested stone is used, first in a back and forth movement until the surface becomes homogenous, and then alternating strokes (5-5-3-2) on each side, for a total of 20 strokes towards the apex per side. No pressure is applied but the weight of the apparatus.

    The edge is then analysed in the electron microscope for breakouts and morphological appearance.

    SEM micrographs of the edge finished with the “YB”. Instrument: Thermo Fischer PhenomXL SEM.

    The blade has a nice gloss to it, and very small, fine scratches all over it. The actual cutting edge is sharp and well defined – albeit with some serrating. These serations are typically right at the end of a scratch – I suspect larger, jagged particles, that tear out a bit from the cutting edge.

    Overall, the stone gave a nice feedback and a very clean finish. The blade tested in at ~ 120 BESS, which is an improvement over the pre-finishing with artificial stones. This is a very fine, very cool stone. I like it and I can now understand the Internets fascination with natural stones! That something dug out of the earth leaves such a fine finish and wonderful edge with this preparation is quite remarkable.

    Sharpening disclaimer: I use a standardised approach to sharpening, which basically follows how most manufacturer of guided systems tell you to use this system. I am very aware, that every stone could perform much better than this, in terms of sharpness, but I want a comparable approach. The sharpening segment mostly shows the material removal mechanism – is it burnishing? is it cutting? is the cutting pressure too high so that carbides crack? Is there massive burr or prow formation? The BESS value definitely doesn’t highlight the ultimate sharpening performance of the stone, but was an often requested information. Over time, this blog will show BESS values for different edge morphologies, but by the holy endmill – don’t read it as a „this is the max value this stone can achieve“. I would also suggest to familiarise yourself with the works of Immanuel Kant, it’s absurd I need to write such a disclaimer here.

  • A brief study on sharpening stones – Part 13 – Blue Belgian Coticule

    This is part of a series of blog posts – looking into the appearance and composition of commercially available sharpening stones. If you are interested in the previous episodes, check out the archive for them.

    If you have some suggestion on what I should look at next, or want to share your super secret DIY stones, I could be persuaded to open the bag of analytical devices… hit me up on Instagram under @marvgro for that.

    Disclaimer: I’m not for sale. Every review you see on this blog is bought with my own money. I have no affiliation to any manufacturer.

    Review

    Today’s sharpening stone is a natural stone. Belgian coticules are a very well renown grinding and sharpening stone. They are commonly found in the Ardennes region of Belgium in central Europe. It’s a sedimentary rock with a high content of very fine garnet, a hard silicate mineral. Hence their suitability for sharpening! Because blue Belgian coticule is quite a mouthful, I’ll appreviate it as “BB” for the rest of the article.

    Let’s take a look under the microscope!

    Optical micrographs of the “BB”. The magnification is visible in the lower right corner. Instrument: Leica Emspira.

    It quite definitely is a natural stone, and the reddish garnets are easily visible, even at low magnification! Let’s take a closer look under the SEM:

    SEM micrographs of the “BB”. Instrument: Zeiss GeminiSEM560.

    The morphology of the stone is a mix between very fine, flakey particles and rhombic particles. The majority of distinguishable particles is in the size range of very low double digit µm. The stone is quite dense, with very few voids.

    To dig a bit deeper into the chemical composition, we will be using an EDS sensor to identify elements. If you are interested, I’ve written a brief introduction into the different analytical techniques of the SEM here.

    EDS analysis of the “BB”. Instrument: Oxford Ultim Max  ∞ 40mm2 EDS sensor. Note that our EDS sensor doesn’t show elements lighter than boron.

    The chemical analysis shows a typical natural stone – it’s bright, colourful and there’s a lot of elements into it. Garnet is a mix of Mg, Fe, Mn, Al, Si and O, which are all elements we are able to find above. In addition, there’s Ti and K, Na.

    Whenever I look at natural stone, I’m reminded at how complex mineral geology is. These other elements are all easily replaced inside the minerals, as their chemical behaviour is similar. One can see that the actual garnet on this stone is not super dense – looking to the signal from Fe, Ti and Mn should point out the garnet distribution in the upper interaction volume of the stone.

    There has been a massive amount of research, mineralogy and history of whetstones undertaken in regards to the belgian coticule. Besides modern high resolution SEM analysis, I don’t think I have the expertise to add something to it. There’s a fantastic, very long document initiated by Henk Bos: “Grinding and Honing Part 4: Belgian Whetstones INFO 20M”.

    Instrument: Bruker Alicona µCMM, 50X objective lens, 3×3 FOV high resolution focus variation scan. Data is leveled and outliers removed (0.25%).

    The surface measurement shows a fine, dense surface. A high material ratio points towards a highly active surface area, reducing the force per grain. I believe that the typical application of these stones is to create a slurry of abrasive garnets on top, which aid in lubrication but also material removal.

    ISO 25178 parameters.

    The ISO 25178 parameters confirm this – a relatively smooth stone, with a low spread for parameters such as Sdc and Smc.

    In order to evaluate the sharpening performance and material removal mode of this stone, a blade was sharpened with it. I am using a standardised testing procedure, read about it hereNevertheless, it’s 65 HRC M398, and sharpened to 17 DPS with resin bond diamond stones down to 10 µm. Afterwards, the tested stone is used, first in a back and forth movement until the surface becomes homogenous, and then alternating strokes (5-5-3-2) on each side, for a total of 20 strokes towards the apex per side. No pressure is applied but the weight of the apparatus.

    The edge is then analysed in the electron microscope for breakouts and morphological appearance.

    SEM micrographs of the edge finished with the “BB”. Instrument: Thermo Fischer PhenomXL SEM.

    The blade has a multitude of small scratches and prows along those scratches. The actual cutting edge is sligthly blunted, and there is some amount of carbide cracking near the edge. The blade tested to a value of 140 BESS. Compared to the preparation with DrMarv stones beforehand, the edge lost some gloss and mirror finish. I think this stone would work fantastically as a roughing stone for less high-tech steels, where the carbide content is lower.

    Sharpening disclaimer: I use a standardised approach to sharpening, which basically follows how most manufacturer of guided systems tell you to use this system. I am very aware, that every stone could perform much better than this, in terms of sharpness, but I want a comparable approach. The sharpening segment mostly shows the material removal mechanism – is it burnishing? is it cutting? is the cutting pressure too high so that carbides crack? Is there massive burr or prow formation? The BESS value definitely doesn’t highlight the ultimate sharpening performance of the stone, but was an often requested information. Over time, this blog will show BESS values for different edge morphologies, but by the holy endmill – don’t read it as a „this is the max value this stone can achieve“. I would also suggest to familiarise yourself with the works of Immanuel Kant, it’s absurd I need to write such a disclaimer here.

  • Musings about material removal – Part 2 – Dressing sharpening stones and inevitable contamination

    TL;DR:

    Lemma: When flattening / dressing a sharpening stone, what’s the best approach to avoid contamination?

    Methodology:

    • Made some contamination free 10 µm resin diamond sharpening stones with a low to medium grit concentration (20% by weight).
    • Flattened 1 sample each on a glass plate with a water slurry and a typical abrasive: 3 different grain sizes of SiC, on diamond powder of identical size
    • Flattened 1 sample on an electroplated stone under running water
    • Flattened 1 sample on a piece of SiC sandpaper (F1500).
    • Looked under the SEM for contamination – using a backscatter detector which shows elemental contrast and EDS, which identifies elements and thus nails contamination down.

    Results:

    • Flattening a resin stone on SiC will embedded the SiC particles in the surface, no matter how small the particles are (larger / smaller than the grit of the stone).
    • Flattening a resin stone on EP stones works very well, but you will inevitably catch a couple of those larger diamonds. It also consumes the EP stone very quickly.
    • Flattening a resin stone on diamond powder will embed the diamond in the surface layer, but also create quite a bit of glass-particles that will get stuck in the surface layer. Those particles are sub micrometer sized and I would consider them a health hazard if airborn.
    • Flattening a resin stone on SiC paper tears out the diamonds, surprisingly enough. There is very little contamination.
    • A better flattening / dressing approach is needed to keep stones pure. I employ one on the DrMarv stones that does not contaminate. Watch out for a future blog post on how to do this.

    Actual Science and long version:

    This is part of a series of blog posts, where I try to apply my professional knowledge on how chip formation and material removal happen to knife sharpening. I think this could also be called: debunking myths. Because this probably will ruffle some feathers, and is likely to be denied by some people, let me state firmly here: everything you will see in this post is real, and repeatable.

    Sharpening stones experience uneven wear. This is because they are inherently anisotropic in their composition, but also because we as humans use them inequally. Often, the end parts of the stone do not get used, as you do not want to fall “off the edge”. Moreover, different movements, pressures and just general wear sometimes require you to flatten, dress or renew a stone. For simplicity’s sake, I will from this point onwards call the process “dressing”, as it is the technical term. What you apply this to (renewing the surface, flattening the stone or actual dressing, e.g. creating a surface morphology suited to the application) is irrelevant, as the general mechanic is a 3 body abrasion on a flat surface.

    I’ve done a ton of reviews on sharpening stones so far, and the largest majority of these had particles embedded that shouldn’t actually be in them. Some of these contamination stem from non-sufficient abrasive hygiene in the factories (you’d be surprised how easily micron sized powder becomes airborn and lingers for hours!), but some also from dressing these. At higher concentrations, SiC is used as a filler material, decreasing cost and increasing the bond hardness.

    Three different approaches have been analysed for this:

    I.) Abrasive slurry on a glass plate

    A often suggested dressing method is a piece of glass (which is surprisingly flat!) or granite, and to mix an abrasive slurry on top of this glass surface. Often, SiC is used, as it’s a hard abrasive, easily and cheaply available. If you want to take a look at what the SiC I used looks like, head to this abrasive snippet.

    For the actual dressing, I took a flat piece of silica-glass. It was cleaned by rubbing it vigorously with a soap-water mixture and then rinsing under running water. A small amount (about 3 grams) of SiC powder was applied to the surface and water added until a slurry that is soft but does not run away much was created. The sample specimen was then moved in a figure 8 movement across the surface until the top surface flattened out nicely. The sample specimen was then rinsed under running water while being rubbed intensively. Afterwards, it was dried and put into a sample holder where it is unable to touch other samples. Before SEM analysis, the sample was cleaned with a de-ionized water steam cleaner (110°C, 3 bar) and rinsed with 99 % pure ethanol. It was dried with a blast of compressed and filtered air.

    Optical micrograph of the dressed surface. Abrasive used: SiC FEPA 300, 400 and 1000. Note the very even and homogenous surface and continuously smoother surface. Instrument: Leica Emspira.

    3 different grain sizes of SiC were employed to dress 3 identical samples. FEPA grades 300, 400 and 1000, corresponding to micrometre sizes of (roughly) 34, 17 and 4.5 µm. This means there is a much larger, a larger and much smaller grain size used. The microscope images clearly show that it’s very hard to pick out the SiC particles from the actual abrasive, as they are very small and every particle is reflective. Playing with the polarisator on our microscope didn’t really change anything on this.

    Luckily enough, it is very easy to distinguish SiC particles in the SEM, as Silicon is a much heavier element than the carbon predominant in resin and diamond. Thus, the backscatter detector (BSD) shows these as very bright particles. Final identification can be undertaken via EDS analysis. If you are unfamiliar with these techniques, I’ve written a blog post explaining these.

    Let’s start with the FEPA 300 grit SiC powder:

    SEM micrographs of the FEPA 300 SiC powder dressed resin stone. The lighter coloured particles are SiC.

    A very large number of evenly distributed, very bright particles is visible. Because of the used detector type (BSD), this means the particles consist out of heavier elements than the surrounding material. As diamond and resin both mostly consist out of carbon, this is alreadys a very good hint that we are looking at SiC. EDS analysis reveals this:

    EDS analysis of the FEPA 300 SiC powder dressed resin stone. The lighter coloured particles are easily identifiable as SiC.

    The finer grit SiC (FEPA 400) also shows a similar picture – evenly distributed, top layer embedded SiC particles.

    SEM micrographs of the FEPA 400 SiC powder dressed resin stone. The lighter coloured particles are SiC.

    EDS analysis confirms these particles to be SiC again.

    EDS analysis of the FEPA 400 SiC powder dressed resin stone. The lighter coloured particles are easily identifiable as SiC.

    The finest SiC grit used, which is below the abrasive size (4.5 vs 10 µm diamond) also shows fine, embedded particles.

    SEM micrographs of the FEPA 1000 SiC powder dressed resin stone. The lighter coloured particles are SiC.

    EDS analysis also confirms that these are SiC particles.

    EDS analysis of the FEPA 1000 SiC powder dressed resin stone. The lighter coloured particles are easily identifiable as SiC.

    Next, I took the “expensive” route. The stone is made from 10 µm diamond powder, why not take that same-batch diamond powder to dress it? After all, it is an abrasive, and contamination can’t happen here…can it?

    Optical micrograph of the dressed surface. Abrasive used: 10 µm diamond powder. Because of the low material removal rate, only a smaller section was dressed. The different area in the top left colour is from before-dressing. Instrument: Leica Emspira.

    One thing of note is that the diamond slurry is pretty expensive to make, and it also is very slow in the dressing. I rubbed about twice as long as on the SiC slurry, and had a smaller section dressed. Nevertheless, it’s enough for SEM analysis!

    SEM micrographs of the 10 µm diamond powder dressed resin stone.

    We can immediately see, that some diamond was embedded into the top surface. It’s visible as flat grains, that are all equally sized – this is different to how the actual resin stone looks like, where diamonds are always at different depths and peaking in or out. Moreover, if one zooms in very far, small, bright particles become visible. This is interesting, as they are sub 1 µm sized!

    EDS analysis of the diamond powder dressed resin stone. The lighter coloured particles are identifiable as SiO2

    EDS analysis shows that these particles consist out of oxygen and silicon. Spot analysis confirmed a ratio of 1:2, so this is likely SiO2 – the glass plate we used seems to have abraded and embedded itself into the stone. I find this very fascinating, as we didn’t really see these particles on the SiC dressed stones! Sub micron particles out of glass can be considered a health hazard. I would advise to wear a mask on all heavy abrasive actions!

    II. Dressing on electroplated diamond plates

    One pricey alternative is to use an electroplated diamond plate. The advantage here is that the abrasive is pretty firmly bound to the plate, so chance of contamination should be lower, and we can aid the process by dressing under running water, which will automatically flush between the two abrasive bodies. The downside is besides the cost of the plate a very large wear on the EP plate.

    Optical micrograph of the dressed surface. Abrasive used: 600 grit EP diamond plate. Note the very even and homogenous surface with some very bright particles. Instrument: Leica Emspira.

    Under the optical microscope, a few large, bright particles are visible.

    I was hunting for these under the SEM, and while I mostly found a well dressed resin stone, a few of these larger particles were also visible!

    SEM micrographs of the EP diamond plate dressed resin stone.

    The particle size of > 25 µm is consistent with the 600 grit EP stone used.

    EDS analysis of the diamond EP 600 grit dressed resin stone. The large particles identify as carbon, so are likely diamond particles that have come loose from the EP stone.

    While it’s a nice dressing result, and the contamination is rare, these diamond particles are 3x the size of the resin stone diamonds. These particles will continuously create very deep scratches.

    III. Dressing on SiC sanding paper

    Lastly, I dressed a sample on some SiC sanding paper. This was done with a bit of ethanol as a lubricant. The SIC paper was by far the quickest way to dress the surface, but left some deeper scratches visible on the surface:

    Optical micrograph of the dressed surface. Abrasive used: FEPA 1500 SiC sanding paper. Note the visible scratches. Instrument: Leica Emspira.

    SEM analysis reveals not only these scratches, but also some brighter particles. Moreover, instead of really dressing the surface, it also removed all surface layer touching diamonds! We are left with a very porous surface with few diamonds visible. I would guess that this surface will immediately clog with swarf.

    SEM micrographs of the FEPA 1500 SiC sanding paper dressed resin stone. The lighter coloured particles are SiC.

    EDS analysis confirms the bright particles as SiC.

    EDS analysis of the FEPA 1500 SiC sanding paper dressed resin stone. The lighter coloured particles are easily identifiable as SiC.

    Conclusion

    I am quite surprised. All analysed dressing methods leave us with contamination. I would say in aspects of having the best performance, the diamond slurry dressed stone is probably king – no larger or other particles are introduced. The minuscule amount of glass should be easily avoided by wearing personal protective equipment – which in my opinion, you should always wear during dressing.

    The SiC dressing embedded foreign particles. At sizes larger than the diamond, this will leave you with a stone that produces deeper scratches. At a size smaller than the diamond abrasive, you’ll just increase the grinding pressure, and make your diamond stone slower.

    The SiC sandpaper was surprisingly effective, considering it was a finer grit. Unfortunately, it also removed the diamonds from the matrix, a first here. I wouldn’t recommend it here!

  • Abrasive Snippets – Part 3 – SiC Grains (FEPA 300, 400, 1000)

    This is part of a series of posts about abrasives. This is mostly cool SEM pictures, but I find them interesting. It’s quite difficult to image small grains at large magnifications, so there’s very limited information and pictures online about them. Head over to the archive to see the other snippets on abrasives.

    Today’s abrasive is SiC. Silicon carbide is a fantastic engineering material, and also quite hard. Depending on the polytype, you get between 2000 and 3000 HV, which makes it kinda like the 3rd or 4th hardest commercially available abrasive. It is also super temperature resistant and very chemically inert. Again, depending on the polytype, it is either green (4H-SiC) or black (6H-SiC).

    What’s the difference? The crystal structure. While SiC is typically hexagonal oriented, the different polytypes show different stacking orders. While 6H is stacked ABCACB, 4H is stacked ABCB

    Crystal structure of 6H-SiC.

    This property is called polymorphism, many minerals exhibit this, but SiC is unique in terms of there being 250 different known polymorphs.

    The SiC we are looking at was bought at a German sharpening supply, sharpeningstones.de. They declare it as FEPA 300, 400 and 1000 grit, which would correspond to (roughly) 34, 17 and 4.5 µm.

    FEPA 300 SiC

    SEM Micrographs of FEPA 300 SiC particles. Instrument: Zeiss GeminiSEM 560.

    FEPA 400 SiC

    SEM Micrographs of FEPA 400 SiC particles. Instrument: Zeiss GeminiSEM 560.

    FEPA 1000 SiC

    SEM Micrographs of FEPA 1000 SiC particles. Instrument: Zeiss GeminiSEM 560.