
I’ve started my journey into “knife sharpening” a couple of years back with some cheap, free hand (unguided!) waterstones from a large, american online delivery service. I think it goes without saying, that my experience with those was more than frustrating. Messy, frustrating and kind of disappointing in terms of achievable finish and sharpness. Probably caused by 2 things: my lacking skills, and the poor quality of those. Improvements were made with a higher quality stone, and finally some galvanic bound diamond sharpening stone. Nevertheless, I was longing for something powered. After all, if it’s not driven by an electric motor, how good can it be?
My good friend Roman, the steel-virtuoso from Switzerland (check out: https://www.kase-knives.com/ or find him on http://instagram.com/kknives_switzerland ) convinced me that the only real way to go is the Tormek T8. It’s a rotary grinding machine, where you clamp your knife in a (hopefully) symmetric holder and then grind along a bar. By setting the height of the bar, you can adjust the angle of the knife blade.

Now, if you just want a sharp knife, in a decent amount of time, and don’t have two left thumbs, this is a fantastic machine. But: it’s not the end. And with this, I dug deep down into the rabbit hole that is sharpening.
The original wheel is a galvanic bound diamond wheel. What does this mean? It uses an abrasive (in this case, diamond!), and this abrasive is fixed as a single layer to a metal body. The bond holding the diamond on the wheel is typically electroplated nickel. Under the scanning electron microscope, such galvanic bonds look like this:


Here, the diamond grit is visible as black, little grains. The metal bond is the smooth, light coloured matrix around them. On the lower left o every picture, you can see the scale bar. For a better impression of the size, “FW” is the field of view, so the width of the image from left to right. These images were taken with a small, capable desktop SEM (a Thermo Fischer PhenomXL, which has a thermionic electron source and a 100x100x40 mm large sample chamber). The height map was also created via selectively switching the 4 sectors of the BSD sensor inside the SEM.
The advantages of galvanic bound grinding bodies are plenty: They are very clearly defined in their shape, the bond is very strong (it is difficult to tear out a grain, so grain retention is high), and they are considered “easy cutting”, because the large gap and overhang of the grinding grains lower grinding pressure and have plenty of space for removed material (the “swarf”).
The downside is: you only have 1 layer. Once that is gone, your grinding wheel is used up. It’s difficult to embed very small grains. And sometimes, a grain sticks out really far – this leaves a long streak on your surface, digging really deep. And then the internet believes, you can’t dress them…
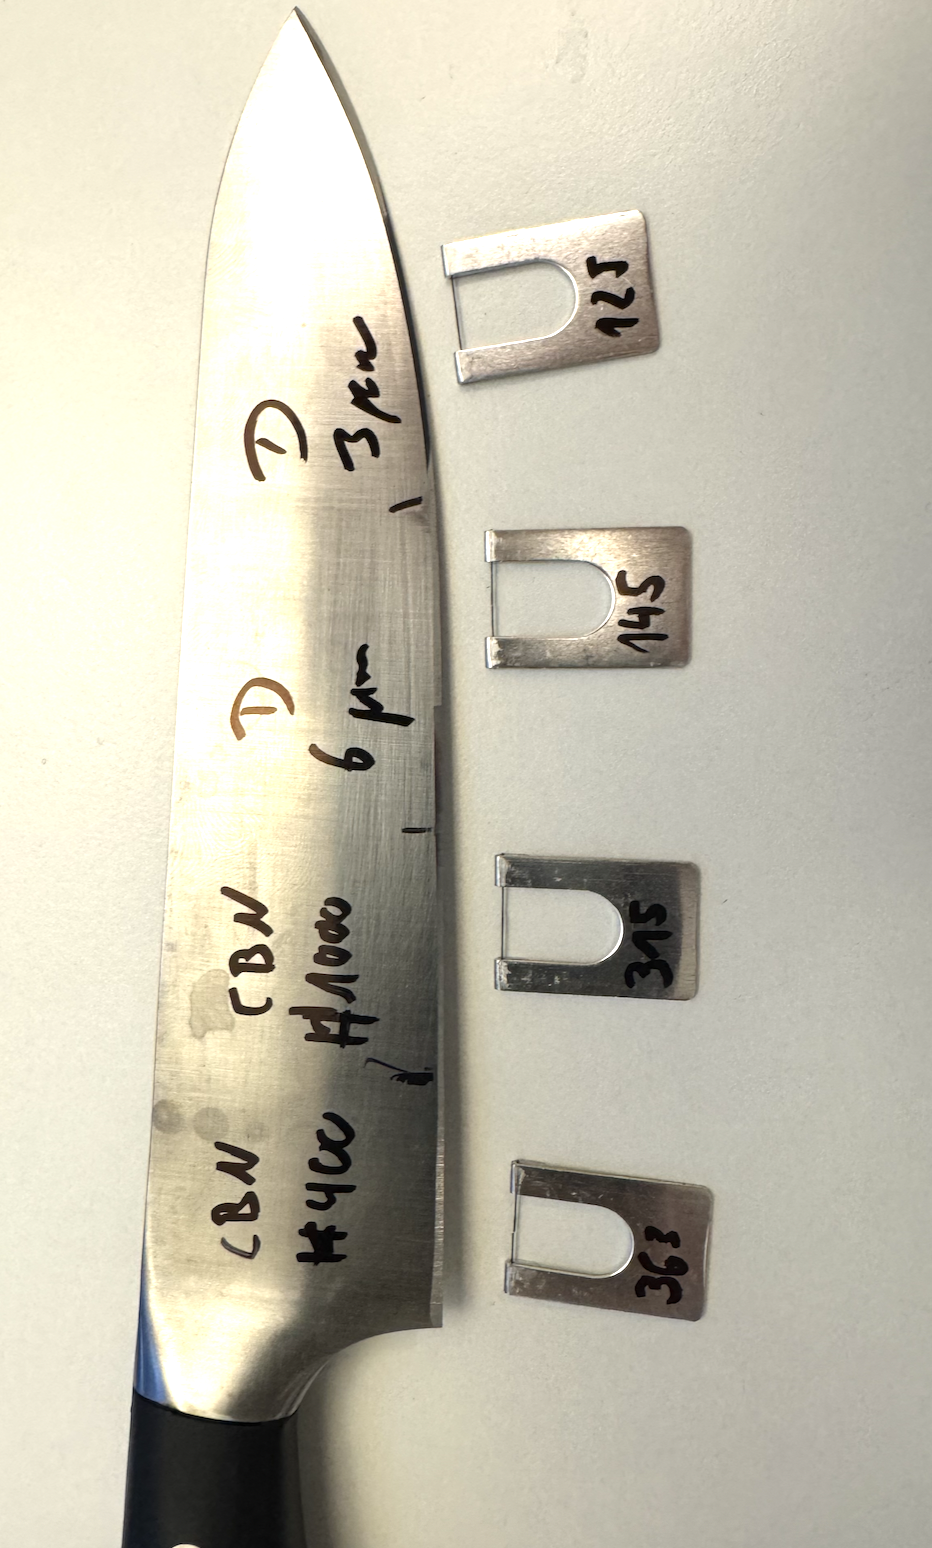
At this point, I decided to go down the rabbit hole and get a couple of wheels that are considered “high end”. Mainly, a #400 Grit CBN wheel, a #1000 grit CBN wheel (both galvanic bond), and a 6 micrometre and 3 micrometre diamond wheel (both resin bond). And while they make a very pretty and glossy surface, and a sharp knife edge, I was curious to dig a little deeper into how the surface looks like.
For this, I prepared a knife with increasingly finer edge preparation. First, only the #400 grit CBN wheel, then a section of the blade with #400 and then #1000; followed by a section going through the two CBN wheels and then the 6 micrometre diamond wheel, and then at the very tip, all wheels down to the 3 micrometre diamond wheel. The knife used was a cheap “IKEA” knife from stainless steel. I choose 19 degrees per side (DPS). You’ll see in a moment why I choose a cheap knife.
The following gallery shows optical microscopy micrographs of the cutting edge quality:


Optical microscopy shots of the cutting edge prepared with #400, #100 grit CBN, as well as (darker colored, smoother) 6 micrometre and 3 micrometre (nearly “flawless” at this magnification) diamond resin wheels.
I then cut the blade apart, and analysed the cutting edge quality in the SEM.


The cutting edge after the #400 grit CBN wheel. SEM micrographs show an overview, the surface morphology in the middle of the cutting chamfer as well as a detail view of the cutting apex.
This piece of the blade measured in at 363 bess. The resulting BESS media looked pretty torn up:

The #1000 grit CBN wheel, which is often considered the “finest” sensible CBN wheel, left a much nicer finish:


The cutting edge after the #1000 grit CBN wheel. SEM micrographs show an overview, the surface morphology in the middle of the cutting chamfer as well as a detail view of the cutting apex.
The BESS measured in at 315, and the media looks much smoother cut:

With the 6 micrometre diamond wheel, the finish is starting to approach the resolution limit of this small desktop SEM, as it becomes smooth enough to be nearly flat.


The cutting edge after the 6 micrometre diamond resin wheel. SEM micrographs show an overview, the surface morphology in the middle of the cutting chamfer as well as a detail view of the cutting apex. Note the two additional images at a higher magnification to showcase the burr formation.
The BESS value clocked in at a respectable 145. The media is nicely sliced:

The final “polish” was done with the 3 micrometre diamond resin wheel. This one already exhibits quite a bit of pressure, and doesn’t remove a lot of material.


The cutting edge after the 3 micrometre diamond resin wheel. SEM micrographs show an overview, the surface morphology in the middle of the cutting chamfer as well as a detail view of the cutting apex. Note the two additional images at a higher magnification to showcase the burr formation.
The BESS score clocked in at 125. The media is properly cut:

Leave a Reply to Dr MarvCancel reply